Deegatron - 3rd build Multiscale

Deegatron

Well-Known Member
Joined
Jun 29, 2013
Messages
796
Reaction score
581
Location
Edmonton, AB
Heya Guy's,
My first post on Sevenstring.org. 3rd Build. long time lurker... figured this build was metal enough to justify starting a thread here.
Specs:
25.5"-24.75" multiscale
Magnet cavity covers
SS jumbo frets
1-5/8" nut width
custom birdseye maple / aluminum bridge with graphtech saddles.
Tung oil finish
Padouk neck
Birdseye maple fretboard - black MOP dots... if I can find someone that'll ship em acroos the border... :mad:
Basswood body - dyed black
Curly red western cedar drop top - got a SCREAMING deal on ebay. couldn't say no...
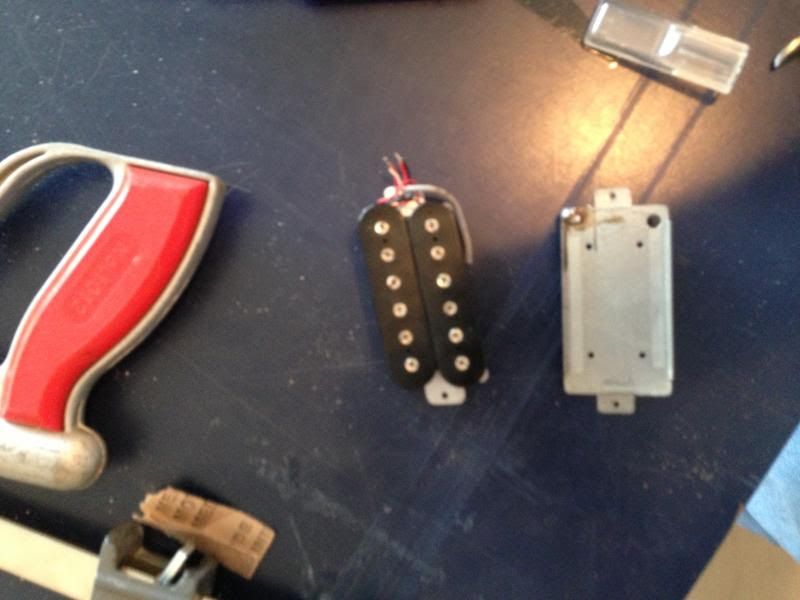
Pickup - undecided... I've got an old beat up pickup out of an old aria pro that i'll be using for mockup.... im leaning towards a crunch lab in the bridge and no neck pickup.
Volume / tone / switch for coil split
Superstrat ish body style...
Bolt on style neck. I used six 6 mm bolts with inserts on my last build and will likely do so on this build. they make normal screws look like play toys... and im all about over doing it... im a little worried they'll pull right thru the basswood so I've got a plan to hide some maple in there....
3x3 headstock

I'll admit im a terribly slow builder but im already a ways in and i'll post updates as soon as they happen.
currently the body and drop top are jointed and glued. Just finished building a thicknessing jig for the router so I can clean up the basswood and get it down to about 1.5" thick.
See below for pictures of current progress....

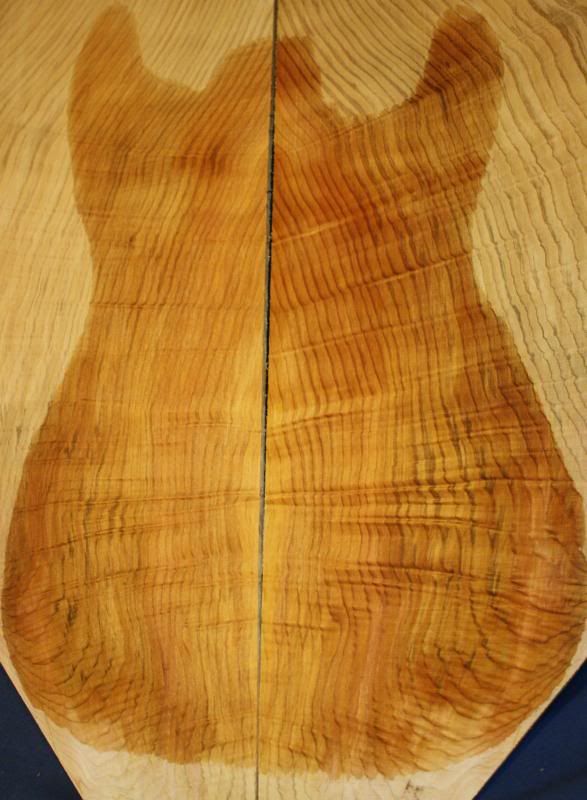
That's the top with some mineral spirits on it. should pop like mad once it's finished.


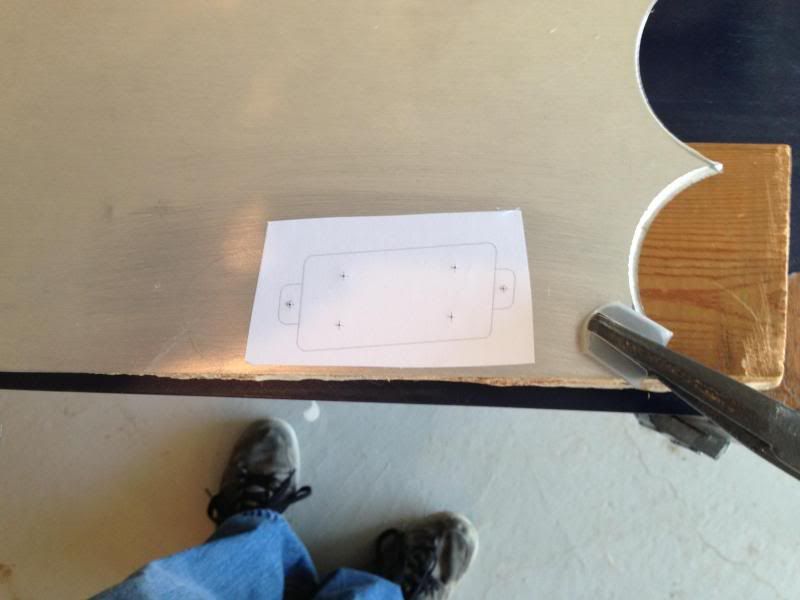
Angled pickup baseplate...
both the pickup baseplate and bridge plate were drawn in CAD printed, glued to the aluminum, drilled by hand, cut out with a hack saw and filed to the lines. took some time but actually came out nice...

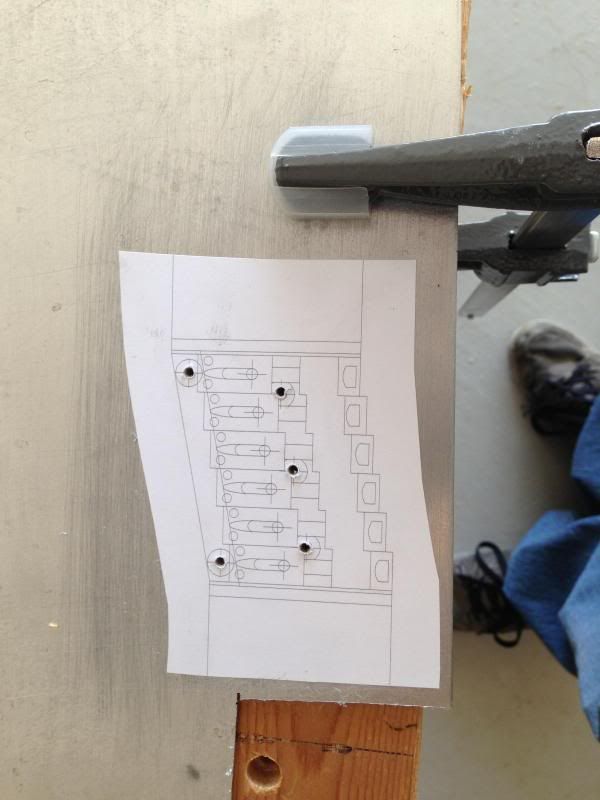
This is the bridge in process

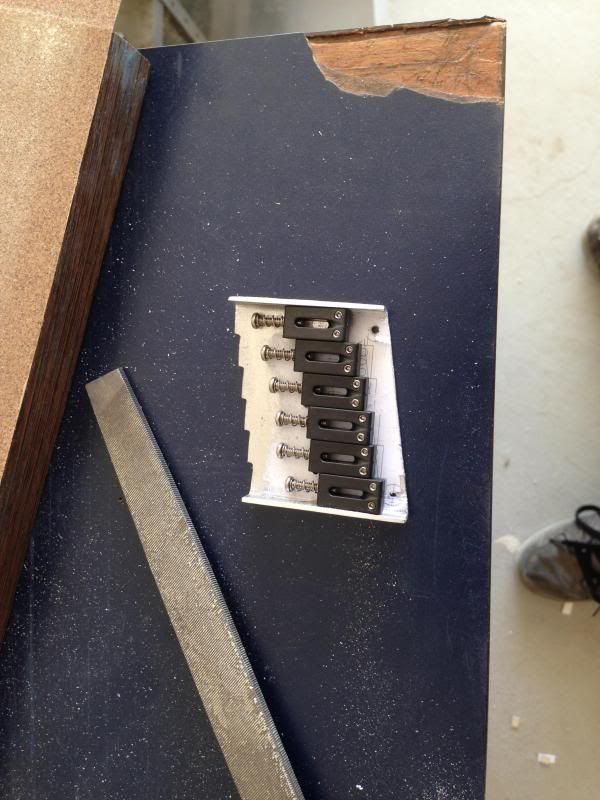
Nearly done, just needs the maple back to hold the screws... Im waiting on a drill press before I finish this but I cant seem to find a nice one on kijiji... don't really wanna pay full price for a new one...
 

This site may earn a commission from merchant links like Ebay, Amazon, and others.

Deegatron

Well-Known Member
Joined
Jun 29, 2013
Messages
796
Reaction score
581
Location
Edmonton, AB
Got nearly a full day in the garage today.
Finished thicknessing the basswood for the body.
My thicknessing jig for the router... built it yesterday for $30 bux. crude but highly effective.... but slow... very slow....

From there I cut out the basswood and cedar to aprox 1/8 oversided with the jigsaw and a coping saw for the cedar... I was afraid the jigsaw would tear it up... the coping saw did enough of that as is...


Super happy with my joints this time around...

started with a plane and finished with a bard with sandpaper on it... you can hardly see the joints which is a big step up from my last 2 tries...

After that I built a fret slotting jig... its large enough that i'll be able to angle the fingerboard to get the fan im looking for without any issues.. last 2 builds I used preslotted fretboards.. not sure about this but it's a little too late to back out now...
Just a side note on cedar....
I love how that stuff smells when you cut it.... I deffinatly intend on using more of it if I can... it seems pretty soft... but I think I can live with that for the smell alone....
 

FruitCakeRonin

ss.reg orgular
Joined
Jun 17, 2012
Messages
191
Reaction score
19
Thats a pretty, interesting top. Also don't think I've seen a 6 string multiscale before.

question, are you using a router to clean up the body shape, or do you just sand after cutting with the jigsaw ?
 

Deegatron

Well-Known Member
Joined
Jun 29, 2013
Messages
796
Reaction score
581
Location
Edmonton, AB
Game plan was to clean it up with a router.... but Im a little afraid the cedar will not co-operate.... Will have to do a few test pieces to see if the cedar tears out with a router or not... if it does i'll have to sand it... which may be a very time consuming affair.... I suppose it's a good day to buy a ROSS....
 

Deegatron

Well-Known Member
Joined
Jun 29, 2013
Messages
796
Reaction score
581
Location
Edmonton, AB
Yesterday was NEW TOOL DAY!!!!
Picked up a stand up drill press from kijiji for $130... screaming deal I think.....


seemed to run nice and true and was in great shape....
got it home... and things aren't going soo well....
Chuck had some mega runout... so today was "fix the crap you bought yesterday day"
bought a new chuck and matching arber or whatever it's called... swapped in the new chuck.... swing and a miss... still has some solid runout... just not acceptable.... so I tore the whole thing down... the bottom bearing appears to be a little loose... Im not sure if it's enough to cause the runout but i'll have to replace the bearings and see how she spins... everything else on the drill press is working like a charm so im not real upset I had to spend $20 on a new chuck (which I likely needed anyways) and another $20 or so on bearings... Im just praying to the gods of metal that nothing is bent.... I work for a company that has a machine shop... but i'd rather not have to go around there asking for favors to straiten my drill press spindle.... I suppose i'll find out shortly... I've got a mini press at home that I built in shop class at nait... perhaps that will be the answer....

While I was in the west end picking up the new chuck, I also stopped by lee valley and picked up one of their "template sanders" thinking i'll use that to finish the OD on the body so I don't have to worry about tearout... I will report back on how well it worked.... it should also work for making templates if I can take the bearing off the bottom.....
 

Deegatron

Well-Known Member
Joined
Jun 29, 2013
Messages
796
Reaction score
581
Location
Edmonton, AB
Sorry for the lack of updates. Danm drill press turned out to be more of a project than I had planned.
reguardless it's done and usable now. also had to repair a new sander I bought from craptastical tire. I would have returned it but of course I lost the recept.. either way that's up and running as well... enough excuses. updates.....
I built a jig for gluing the top to the body.... didn't have enough clamps and needed the mdf for templates anyways.... so it really cost me about $15 bux for all the bolts and i'll reuse the bolts to glue on the fretboard.... so epic win....


Once I was done I cut one piece of the clamping jig into a template and tried to robosand the body to the template... epic fail.... it took WAY too long, didn't get quite to the line and just overall didn't work.... wound up routing to the template... which worked out quite well but gave me some router burn in some area's.... wish I had a router table... but no biggie, I'll build one for my next build.
Left with this....


Im not really happy with my bridge design... it's just not producting a professional result like I was hoping for....

Im trying to find some aluminum T-bar to do something similar to agile multiscale bridge but no-one local sells danm aluminum t-bar... it's kinda frustrating....
whatever... is what it is...
 

Deegatron

Well-Known Member
Joined
Jun 29, 2013
Messages
796
Reaction score
581
Location
Edmonton, AB
Couple small updates. as mentioned... im a slower builder compared to most of the guys on here....
Slotted the fretboard.
Was rather worried as im not able to print out a full size template due to paper size on my printer... got around it by taping 2 pieces of paper together and then entering it into the computer as a "custom paper size" then I was able to print a full length template in 1 print so I didn't have to worry about aligning 2 pages after everything was printed... worked like a mother freaking charm....
here is the result.

it looks like shit... but that's just the paper getting ripped up from the sawing process... the slots are all exactly where they need to be (hopefully)
fretboard is currently oversized.. it wll be glued to a correctly sized neck black and then routed to correct size...

It's actually a lighter fan than I was really expecting... 3/4" really isn't a lot over 25.5".... reguardless.... I wanted this one to be a light fan to make sure I liked it... next one i'll do 26 to 24 or something and get real crazy...

From there I recessed the holes for the volume and tone knobs...

I used a 3/4" spade bit... will have to remind myself to buy a fostner for this... as the spade chewed up the top a tiny bit around some of the edges... bad plan... live and learn I suppose... it's not too bad.. can prolly sand it out or fill it during finishing...
the knob in there is just a stand in... it will be chrome once everything is complete...
After that was the cavity...

done in about 5 passes on the router... there is a lot of extra space in there... I may put a battery for an active system in there or I may add in a small switch for series/parralell or coil spit or something... or it's always nice to have a little extra room in the cavity.... chicks dig extra room in the cavity...

Next on the list
-print out a template for the neck and start cutting out a neck template... then start the compound scarf joint.
-print out a template for the belly contour and carve that shiznit.
make some templates for the rear cavity cover and cavity cover recess and fit them together... then see if it've got any leftover paduok for the cavity cover... I think I've got a piece just big enough left over from #2.. if not, no worries... Windsor plywood is a short drive away....
-learn kung fu... challenge Keanu Reeves to a ninja showdown to the death. two will enter... one will leave... thunder dome.. thunder dome... thunder dome.....
 

Deegatron

Well-Known Member
Joined
Jun 29, 2013
Messages
796
Reaction score
581
Location
Edmonton, AB
Just a small update today.
wasted most of the day helping my broheim build a deck and then dealing with a wireless connectivity issue. danm printer is wireless and wouldn't connect to our network so I couldn't print out any templates. I almost threw the danm thing out the window.... yeah, awesome sauce.

Anyways, cut the compound scarf today.
surprisingly much easier than I had anticipated.
Process started with my 9" Ryobi band saw. danm things a beast. love it.
it's noisy... and shakes sometimes when it's on... but im pretty sure it would cut through indestructium without complaining.
set the table to a few degree's off center and make the cut.


cut was then cleaned up with my trusty hand plane. the band saw cut was nowhere near where it needed to be. it's impossible to figure out the angles just right...
Next I cleaned it up further with some 120 grit and made sure it was 100% flat. if your work with the plane is good this only takes a minute.

Surprisingly my plane work was acceptable and it only took me a minute or two.

And there she is. complete and ready for action.

I cant seem to make a decision on the pickups I wanna put in this beast. Im calling her the TS-1 by the way. TS stands for Taint Shredder....
anyways, im looking to tune her to something like drop A or A std.... perhaps rock some Djent, a little fear factory, and perhaps some in this moment.
anyone with pickup recommendations.. please chime in.... I should be able to modify just about any pickup to fit the fan so im not worried about that.... One of my side projects is building a pickup winder... might try my hand at that... who am I kidding... I've already got enough on my plate. I'll buy pickups for this one....
 

Hollowway

Extended Ranger
Joined
Dec 28, 2008
Messages
17,988
Reaction score
15,292
Location
California
I love padauk. I just wish it were more color stable. But mm-MM it looks good fresh like that!
 

Deegatron

Well-Known Member
Joined
Jun 29, 2013
Messages
796
Reaction score
581
Location
Edmonton, AB
Hollowway, im actually a huge fan of the color change on padauk. it's like a patina on old shit... only it happens within months... take a nice piece of padauk... let it change color.. then go back and sand 1/2 of it to compare the color... I always like the aged look more... but that's just me...

Anyways, 2 days in the garage.... not a lot of progress tho...
completed my template for the truss rod and neck blank... just waiting on the neck glue up... im fearing this a little as the compound angle is going to make things slip and slide like crazy... decided to take care of other things today...

Also knocked out the belly contour... but neglected to get any good photo's cuz when im in the zone... I ....ing forget to take pictures danmit....
here she is before starting...

I'll get some finished photo's of that up soon...

here I am thicknessing some padauk for the cavity cover...

This trusty thicknessing jig has proven to be a billion times more usefull than I originally hoped it could be... no more uneven wavy stock for me... thicknessed right and nice and flat every time....

cavity cover was then cut out on the band saw and sanded to size...
once again no photo's cuz im a tool.....
then I started on the cavity cover recess template...


and routed


always test on scrap...

wasn't 100% happy with the fit... still needs a little bit of adjustment here or there... but should be a nice snug fit once im done....

lastly I got a photo of the scarf joint lamination I was planning to use but it came out really blurry and pure shit... it's just the end of the fretboard blank glued to the scarf side of the neck blank anyways, so it's not all that special... On my last build I bought a bass guitar fretboard blank and used the excess In the scarf joint... looks perdy...
 

Deegatron

Well-Known Member
Joined
Jun 29, 2013
Messages
796
Reaction score
581
Location
Edmonton, AB
More progress today. this build just keeps marching on... im rather enjoying it. haven't had a single fubar yet.... knock on wood...
Tunes for the day were Monuments Gnosis downloaded off Itunez.

on to the updates.
started by drilling the input jack. I was considering using a electrosocket style jack for this build but decided to go with the trusty flush mount style.
this is always a really tense moment for me. never had a drill press before... it was a billion times easier to get shit strait.
This picture also shows the completed belly contour... done with rasp's and finished off with some sanding...

started with a 3/4" bit to countersink the input jack... followed up with a 1/2" bit thru

I coulda used a 2nd set of hands getting everything aligned but I made due... just took longer....
After I drilled it I was worried that the input jack mounting nut wouldn't fit as it was rather close to the floor of the control cavity... but everything worked out...


Next task was the dreaded compound angle scarf joint glue up.....


Used every single clamp I had.... had to be sure shit wasn't gonna move around on me....
This picture shows a good view of the scarf joint lamination.
as mentioned previously it's the cutoff from the fretboard. nice chunk of birdseye maple... should make for a nice feature once the neck is carved...

so far im pretty happy with it... we'll see once it's outta the clamps.

While the glue was drying there I continued work on the back cavity cover template and finally got it to the point where I was happy with it....
took 3 tries on scrap to get it just right....


nice and tight...

right now no magnets are required to keep it in there... its just held in by friction... actually requires some doing to get it outta there... the last one shrunk a little after a few weeks of being cut... so if that doesn't happen i'll just have to sand the edges so it's not quite soo tight... no big deal...

Next up on the order of operations.
flatten scarf joint.
Rout truss rod slot.
drill truss rod access hole..
rout neck blank to size
make neck pocket template.
rout neck pocket....
 

skeels

..to pay the beels
Joined
Oct 7, 2009
Messages
4,136
Reaction score
795
Location
milwaukee,WI
Really like your cavity cover template jig system thing.

Why do I like curvy covers?
 

Deegatron

Well-Known Member
Joined
Jun 29, 2013
Messages
796
Reaction score
581
Location
Edmonton, AB
Really like your cavity cover template jig system thing.

Why do I like curvy covers?

Can't really say its my thing... Everything here I've seen somewhere else on the interweb before I did it... But yes it worked out really well... Only needed some minor tweaks to be ready to rock...
The curvy cover is a little more work but I definitely think it adds something to the overall ascetics of the instrument... Cuz you know it's not just a plane Jane cavity under there... Someone has taken the time to layout the components and really make things work... Maximize the usable space...
 

Deegatron

Well-Known Member
Joined
Jun 29, 2013
Messages
796
Reaction score
581
Location
Edmonton, AB
More progress today. this build just keeps marching on... im rather enjoying it. haven't had a single fubar yet.... knock on wood...

Oh my god... i spoke too soon.... fubar ahoy....
cut the neck blank too short... yeah... what's that, measure once, cut twice... yeah... my bad...
the blank is too short to cut my headstock.... so it's either cut out the scarf joint and glue in a new peice... or scrap that neck blank and restart from scratch.....
im tempted to restart from scratch... i've always wanted to do one of them ibanez style laminated necks... but never really had the tools for it... i think i could pull it off now with the tools i've got... paduok maple paduok maple paduok... and it'd be balls easier to cut the headstock from a single peice rather than doing a compound angle scarf joint....
imna head to windsor plywood and see what they've got in stock....
I usually like to buy wood at the start of a project so it has time to acclimatize to my garage... but as long as i buy it local i should be okay....
:wallbash: feeling like a total douche right now.... how in gods name did i manage this?!?!?!?!
 

MikeK

Well-Known Member
Joined
Aug 16, 2012
Messages
200
Reaction score
27
Location
Louisville, KY
Damn, that sucks! Might as well finish this neck off at some point and use it for another build down the road if its long enough. Everything else looks to be going good man.
 

Deegatron

Well-Known Member
Joined
Jun 29, 2013
Messages
796
Reaction score
581
Location
Edmonton, AB
bought a big chunk of paduok today...
gonna try to salvage this neck...
I just need to cut off the old scarf joint, clean it up, and glue a new piece on... we'll see how that goes....
If I cut just ahead of the maple lamination I should be able to keep that...
worst case scenario... im out a couple bux for the extra paduok and I need to buy more neck material.... no biggie....
 
Top
')