Esp Ltd MH-400 refinish

tssb

Well-Known Member
Joined
Apr 29, 2012
Messages
352
Reaction score
69
Location
London
I've been wanting to refinish (naturalise) my MH-400 for some time now. Finally found some time to do it, plus lurking around here was a big motivator :)

Started off with some research, found some good examples here (MH-250) and here (MH-1000).

Learning from what happened with the ascender's MH-250,
16awfmt.jpg
i decided to try and preserve the quilted maple top, as i had a rather nice piece.
wa0kzc.jpg

So sanding the front was out of the question. Luckily my dad runs a furniture factory, so he managed to dig up some old lacquer stripper.
so9wy8.jpg

It's about 4 years old, so it's lost some of its strength, which is why i had to do multiple coats of it.
For those not familiar with this type of stripper, it attacks lacquers and dyes but leaves the wood intact. You apply it, leave it on a couple of hours then scoop it off.

Tried it out on a piece of parquet :
2eztzf7.jpg
, worked well so i moved on to the back of the guitar.

2w7iih3.jpg


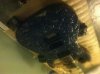
The guitar looked like it had grown some new lifeforms on it.
vg3hpj.jpg


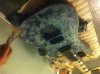
When cleaned, this is what you're left with :
2v93bsn.jpg

9l9vn4.jpg


Recorded a sample of the process for those interested in it :
www.youtube.com/embed/7EFg9jJMwcU
 

This site may earn a commission from merchant links like Ebay, Amazon, and others.

tssb

Well-Known Member
Joined
Apr 29, 2012
Messages
352
Reaction score
69
Location
London
back is down to the sealer which will need to be sanded down, so i moved on to the front.
The pics :
The stripper applied, it's a rather thick gel.
Result after removing the first coat of gel.
The finish on the sides came off a lot easier than the front or back.
 

Attachments

  • IMG_1836.jpg
    IMG_1836.jpg
    683.4 KB · Views: 146
  • IMG_1838.jpg
    IMG_1838.jpg
    821 KB · Views: 207
  • IMG_1840.jpg
    IMG_1840.jpg
    833.6 KB · Views: 149

tssb

Well-Known Member
Joined
Apr 29, 2012
Messages
352
Reaction score
69
Location
London
just applied a second coat on the front & sides, leaving it overnight.

Made a rather curious discovery in the process though : the wood was actually dyed green and the lacquer was blue. I suspect this is what gave the reflections their mild pearlescent effect.
 

tssb

Well-Known Member
Joined
Apr 29, 2012
Messages
352
Reaction score
69
Location
London
pickups arrived as well.

Went for DiMarzio Gravity Storm for the bridge, rather curious how they sound. As for the neck, i'm creating a frankenstein from a telecaster single coil and a hot rails single coil-sized humbucker. I've done this in my vintage japanese Aria Pro II which i bought earlier this year while in Tokyo (good story if anyone's interested) and it seems to work great.

This will essentially give me a humbucker in the bridge (with a coil tap on the volume knob) + a single coil as well as a mini-humbucker in the neck.
 

Attachments

  • dimarzio gravity storms.jpg
    dimarzio gravity storms.jpg
    523.8 KB · Views: 72
  • custom pickup.jpg
    custom pickup.jpg
    697.2 KB · Views: 117

Daf57

5 7s in 4ths
Joined
Jan 26, 2011
Messages
6,127
Reaction score
960
Location
East Texas
This is a great project! I really wish I had another one to refinish, it's hard work with the sanding but at the same time so fun. :) Looks like you are off to good start. Now just need to apply the elbow grease. :) In for the updates - good luck! :yesway:
 

Jed

Active Member
Joined
May 7, 2013
Messages
31
Reaction score
0
Location
Orange County
Thanks for this, I have the same model guitar and would like to do the same once I get some spare time. The only difference is I would probably remove the quilt top.
 

tssb

Well-Known Member
Joined
Apr 29, 2012
Messages
352
Reaction score
69
Location
London
Thanks for this, I have the same model guitar and would like to do the same once I get some spare time. The only difference is I would probably remove the quilt top.

I thought about this too, but the mahogany underneath hasn't got a crazy or good-enough looking fibre for the front imho.

Anyway, been away for some time, so i couldn't work on the guitar, but i'm back now and have been working on it for the past 3 days.

Here's the process :
 

tssb

Well-Known Member
Joined
Apr 29, 2012
Messages
352
Reaction score
69
Location
London
After i removed the laquer and most of the primer with the stripping agent, i started sanding the guitar down.

On the back : at first, i tried 120 grit, was getting nowhere so i moved back to 80. The primer layer is really goddamn thick.

I also decided to reshape the back of the cutaway, for easier fret acces.
.

This is so incredibly comfortable now :)
.

On the front : tried with 120, was taking ages so i switched to a better sandpaper, 150 grit. Tip here, paper-backed sandpaper is crap, look for fibre (linen,cloth,etc) backed sandpaper, works 3 times as quick and you use about 4 times less sandpaper, so worth its price.


As for the inside of the cutaways, tried with a round sanding accesory for drills, didn't work out. Go to slowly and you get nowhere, rev the drill up and it leaves burn marks on the wood. Plus, the size only fit in one of the cutaways and was too big for the other one, it ate out of my fretboard binding. Luckily, i spotted it in time, so the damage was less than 1mm.


All in all, sanding took about 3-4 hours, as I had to be very careful on the front. I did pierce through the veneer in a few spots, but very little, barely noticeable. Turns out its 0.6mm veneer deep-stained, so no matter how much you sand it, strip it or try anything else, the colour will never fully come out. So i was left with a bit of green in the veneers' dark fibre areas.


tssb

Well-Known Member
Joined
Apr 29, 2012
Messages
352
Reaction score
69
Location
London
Finished sanding


Prepping the neck joint for staining, as i don't want the neck stained at all.


Staining agent is water-based, applied with a cloth. Colour is honey, despite is tar-black appearance before application.


The result after staining.

Dries very quickly, 5 minutes in it already looks like this :


Leaving it to dry for an hour gets you here :


tssb

Well-Known Member
Joined
Apr 29, 2012
Messages
352
Reaction score
69
Location
London
And now for the first layer of oil, which gets left to dry overnight. This one is not water-based thought, its a petroleum-based product. I chose an almost transparent oil with a matte finish. The white in the photos is the matting agent inside the oil, which evaporates back to clear in 3 minutes.
 

blanco

Well-Known Member
Joined
Nov 19, 2005
Messages
209
Reaction score
44
Location
London, UK
I actually really like the colour showing through when it was sanded back and white, looks sort of ghost like.
 

tssb

Well-Known Member
Joined
Apr 29, 2012
Messages
352
Reaction score
69
Location
London
After the oil dried overnight, I sanded a smidge with 220 grit then I applied a layer of patina, which is darker than the staining but less potent overall, as it applied and 2 minutes later wiped with a clean cloth. This patina layer will not selectively be absorbed, so it will prefer the darker areas of the fibre, getting rid of the green and turning it more into brown-grey. It also colours the bright areas, but only slightly, turning the yellow-gold into more of an amber colour.

After this came second round of oil, much thicker this time.
TIP : this type of oil does NOT like to be applied with a brush. The brush traps tiny particles of air, leaving directional marks on the sub-surface of the oil.
I had to re-apply a bit of it and spread it evenly using a cloth after 5 minutes. The clue that something wasn't working was that the matting agent was not evaporating, leaving the oil whiteish.

This got left to dry overnight as well.

In the morning, the surface looked like plastic and was sticky. Also, those nice reflections had vanished.

Also note the white insertions in the grain. That's the matting agent that didn't evaporate.


So it got a proper sanding, 220 grit again.
Sanded down about 80% of this last oil layer, leaving just enough so i don't sand off the patina.
 

tssb

Well-Known Member
Joined
Apr 29, 2012
Messages
352
Reaction score
69
Location
London
I actually really like the colour showing through when it was sanded back and white, looks sort of ghost like.

Nice catch, I liked it too, unfortunately though, there was no way of keeping it looking that way. I tested to see what would happen if i just sealed and the green was showing through quite badly, which is why i decided to stain it.
 

tssb

Well-Known Member
Joined
Apr 29, 2012
Messages
352
Reaction score
69
Location
London
After sanding down that last oil layer, i decided to do another layer of patina on the front, to bring it closer to amber, rather than yellow. It would also remove more of the green hues in the fibre.

Back was nice, so no patina there, which gave me the idea to add in a contour line, just like the original finish.

Same patina liquid as before, but this time diluted 50% with water (its water-based, so it works).

Got it taped up


Then applied the patina on the front and side contour line.


And finished up by applying again on the contour line.


The result, viewed from the back :
 

AwDeOh

Well-Known Member
Joined
Jan 14, 2013
Messages
976
Reaction score
43
Location
New Zealand
You've done a fantastic job here man, love that stain! You've also laid out a really great how-to for those who want to do similar. +repped
 

tssb

Well-Known Member
Joined
Apr 29, 2012
Messages
352
Reaction score
69
Location
London
Now, the final oil layer was added. This time, it was a thin layer, applied by cloth (lesson learned :D)


The result. Those nice reflections are back, the surface is nice and smooth, but not glassy or sticky.


I must say, I really love this contour line i added, it's like a nod to the original finish :)


Tomorrow, the cavities get cleaned up and spray-painted black. Hopefully, I also get the time to put the hardware back in. And take some proper pictures, not with a phone.
 

tssb

Well-Known Member
Joined
Apr 29, 2012
Messages
352
Reaction score
69
Location
London
Took all these sequential photos while working on the guitar, so thought what the hell, GIFs ! :)

First staining.


First layer of oil.


First layer of patina : cool reflections. Here : stain + oil + patina. before any of the 2nd oil layer fiasco.


Second layer of patina. So, stain,oil,sanded,patina,oil,sanded,patina.


I recommend downloading them and watching them at a higher speed than this slow-mo embedded version.
 
Top
')