Eve: A Guitar 3 Years in the Making (kind of...)

Rusti

Well-Known Member
Joined
Apr 6, 2010
Messages
321
Reaction score
226
Location
Forli, Italy
Yeah the wood burning tool wasn't very even but it's gonna be covered by flame maple anyway. I'll get around to sanding the clear off of the headstock soon.

When the bit starts to burn or to do unclean routes on the wood it may be time to re-sharp it.
 

This site may earn a commission from merchant links like Ebay, Amazon, and others.

BlackMastodon

\m/ (゚Д゚) \m/
Contributor
Joined
Sep 26, 2010
Messages
8,729
Reaction score
5,768
Location
Windsor, ON
Small update: Redid the bridge posts, hopefully it'll work out now, I didn't test to see if they line up and everything but I did make sure that the posts themselves don't just fall into the holes drilled for them.
IMG_0711.jpg


Blurry pic is blurry.

I also drew out the various levels of carves I'm gonna do on the body, I might add some in between each but right now they are about 5/8" apart except for at the horns. I did buy MDF an started making the templates but they only sold 2'x2' pieces in 1/4" thick pieces so they aren't too good for templating, might just use them for a rough outlines. And yes, I could've bought a bigger piece of thicker MDF but it wouldn't fit in my car and I didn't want to hurt my car :fawk:.

IMG_0713.jpg


IMG_0709.jpg


I'm liking it. Hopefully this weekend or next week I can start doing the carved top and then the control cavity. I also have to make the back route of the Floyd (the part where the fine tuners are, more specifically the little screws that hold the strings in place, yeah you know the ones I'm talking about). Was thinking of making it go along with the carve but I don't think it will look good. I tried to dremel it but the only tool I had for that had really small bits that just burnt the wood so I may just buy a bowl end router bit or what not (one of these little bastards) end do it that way.

Also that ugly area in the neck pocket is where I put some wood filler to make it all level, then I just covered it with a thin layer of wood glue to harden it and then sanded it down again. Hopefully now there isn't a gap on the side when I try to put the neck on there.
 

BlackMastodon

\m/ (゚Д゚) \m/
Contributor
Joined
Sep 26, 2010
Messages
8,729
Reaction score
5,768
Location
Windsor, ON
Update; time for good news and bad news.

Good news:
Finished the control cavity with considerably less burning after I started using the 3/8" bit. I tried to sharpen the 1/2" one but it didn't work as it just kept on burning.

IMG_0724.jpg


IMG_0726.jpg


IMG_0728.jpg


Pretty happy with that, Hopefully I can fit some magnets in that recess.

Here's the Mahogany that I'll be using for the cover plates:

IMG_0730.jpg


It was hard to get a good shot of it but there is a good bit f figure in the wood.

IMG_0732.jpg


IMG_0734.jpg


IMG_0737.jpg


And now the bad news. I did the router 'steps' method for the top carve today but there were a few problems.
Here's an idea of the different levels that I went

IMG_0738.jpg


And a less blurry pic:

IMG_0740.jpg


And here's the product:

IMG_0742.jpg


There was quite a bit of slipups here, unfortunately some of them went right through to the Mahogany. The bit got loose in the chuck a few times and it went deeper than I would have liked. Here's an idea of what I'm talking about:

IMG_0748.jpg


Here's the worst of the tear out:

IMG_0744.jpg


The horns were a huge pain in the ass to do, especially when trying to keep the router steady and then suddenly having it bite into the maple and jump further than you wanted it to.

Here is where it routed slightly too deep and went through to Mahogany:

IMG_0746.jpg


All in all this isn't catastrophic, worst case scenario this means I can't go through with the green and yellow dragon burst I wanted to do unless I make it very dark/almost black on the edges. It was a good learning experience I suppose. If I don't get called in to work any time in the next hour or so then I will start to sand and hopefully it will be a bit better. If not, there's always tomorrow morning.
 

BlackMastodon

\m/ (゚Д゚) \m/
Contributor
Joined
Sep 26, 2010
Messages
8,729
Reaction score
5,768
Location
Windsor, ON
This gave me some hope:

IMG_0752.jpg


IMG_0754.jpg


I'll go pick up some more sand paper and a grinder disc tomorrow me thinks.
 

BlackMastodon

\m/ (゚Д゚) \m/
Contributor
Joined
Sep 26, 2010
Messages
8,729
Reaction score
5,768
Location
Windsor, ON
Bump. This project isn't dead. I got this for and I'm not gonna give up on it, though I am a bit worried about the carves. I figure the worst case scenario will be that there will be about 5/8" of mahogany showing around the edges which I can live with. If that's the case I will most likely leave it natural and not dye it. I just haven't had a chance to work on this because it's record heat in my area. Looking at my weather network app, it says that today it will be 37 C, with humidity feeling like 49 C :eek:. Good thing I have Mass Effect 2 to keep me busy inside :lol:.

On to the real thing. I am having some trouble sanding the carves. I'm at a point wear I need to use the bit of sandpaper on the sander that is on the front (the part that loops over and is attached by, that I can't explain worth a shit), but by using this part the sandpaper rips very easily and eventually comes off the sander. I was thinking of using a grinder but I don't have a lot of room for error here. Maybe a rasp/file to do some of the rough carving and then hand/drum sanding after?

Anyone got an opinion?
 

scherzo1928

has wood for you
Joined
May 21, 2010
Messages
3,605
Reaction score
628
Location
Mexico City
Dont know how I didnt see the last 2 updates.

I think your best bet to get going on removing a bit more material from the carve "steps" is a chissel. Just chissel away at the edges, but be careful, and dont try to take away huge chunks of wood. If not, the disc grinder sounds like a great plan, just be careful, because they take out material FAST.
 

BlackMastodon

\m/ (゚Д゚) \m/
Contributor
Joined
Sep 26, 2010
Messages
8,729
Reaction score
5,768
Location
Windsor, ON
oh fuck man!! how hard was the routing to do? I have a cool RGA mod idea.
Well it was freehand, so it was pants-shittingly scary. Though I realized afterwards that I am, in fact, a moron. If you look at the earlier posts you see that I routed the body out of a big chunk of wood. I still have that big chunk of wood and it would have made my life a lot easier while doing the routing, and I wouldn't have gotten that tear out on the lower horn. That being said, it's very doable, just takes time. Also leave more room than I did, I'm a bit worried to see how it's gonna go and really wish I put more thought into it and left more room.

To Scherzo, thanks for the advice man. And yeah the grinder disc is my absolute last resort because I know it will eat that wood away quick and I want to keep mistakes to a minimum. I'll try the chisel method maybe Saturday or Sunday when it cools down to about 32 degrees C outside :squint:.
 

Rusti

Well-Known Member
Joined
Apr 6, 2010
Messages
321
Reaction score
226
Location
Forli, Italy
Hi, maybe you could round the edges removing the top till the part left is completely clean. like this for example:
78748_9737_dsc03034.jpg


I use to carve guitars with the grinder but i know it may be hard to use for someone since it cuts wood quite fast. I suggest you to use it only if you are very practical with it. Otherwise id go with some chisels and then with sandpaper and a block of wood.
dont give up man! :)
 

BlackMastodon

\m/ (゚Д゚) \m/
Contributor
Joined
Sep 26, 2010
Messages
8,729
Reaction score
5,768
Location
Windsor, ON
So using the metal grinder for the carved top, would just a standard metal cutting disc work fine for wood? Will it burn the wood or anything? I tried a rasp and file earlier but realized it would be way to much work and the horns would be next to impossible to do with those. Any info on the grinder is hugely appreciated.
 

Rusti

Well-Known Member
Joined
Apr 6, 2010
Messages
321
Reaction score
226
Location
Forli, Italy
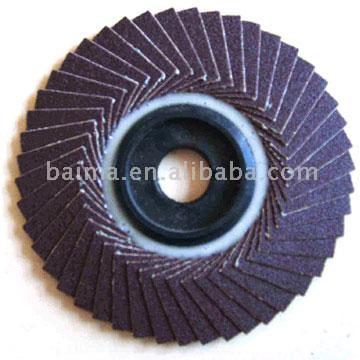
A disc for metal will burn the wood. Buy one for wood, it cost about 3€

dischiabrasivi.jpg


you may also find some disc with a bit of angle, not completely flat and it could be useful for the top.
Keep a lot of attention while working it and practise on another wood first ;)
 

Metal_Webb

Needs more strings
Joined
Jun 11, 2011
Messages
1,280
Reaction score
192
Location
Newcastle, Australia
Just watch out with the flap discs, they tear through timber a lot quicker than you think they would, even the finer grades.
 

BlackMastodon

\m/ (゚Д゚) \m/
Contributor
Joined
Sep 26, 2010
Messages
8,729
Reaction score
5,768
Location
Windsor, ON
good-news3.jpg


I went out and bought one of those magic sander disc majiggers earlier and got back to work (thanks again to Rusti).

Tested first on some poplar:

IMG_0858.jpg


You guys weren't kidding when you said that it takes that wood off fast :ugh:. After I got a little confident, I then got a little crazy and got to work on the body:

IMG_0860.jpg


Not too shabby. This is what I was left with after all was said and done:

IMG_0862.jpg


IMG_0863.jpg


IMG_0865.jpg


IMG_0867.jpg


IMG_0869.jpg


IMG_0871.jpg


I'm not quite sure what I will do about the inner horns. Maybe be SUPER careful with the current disc I have now, or maybe go buy a smaller one. I'll figure something out.

Overall I'm pretty happy with how it turned out, would have preferred if the mahogany didn't have to show on the top but I think it might turn out pretty interesting this way. Hopefully tomorrow or Sunday I will finish up on those inner horns and then I will smooth it all out with some good old fashioned sandpaper. Then I will do the stomach contour on the back...And maybe the neck joint too, we'll see how crazy I am/how comfortable it is without much carving.
 

Swyse

Swyse
Joined
Jan 24, 2011
Messages
1,763
Reaction score
238
Location
N IL
Have you considered just refining the horn part like a ran crusher? Just smoothing it out might look boss. Are you going to do a opaque burst on the sides to hide the mahogany, or are you going to go trans all the way across? A dragonburst would look sick on that.
 

BlackMastodon

\m/ (゚Д゚) \m/
Contributor
Joined
Sep 26, 2010
Messages
8,729
Reaction score
5,768
Location
Windsor, ON
Have you considered just refining the horn part like a ran crusher? Just smoothing it out might look boss. Are you going to do a opaque burst on the sides to hide the mahogany, or are you going to go trans all the way across? A dragonburst would look sick on that.

If I can figure out how to do the RAN style horn carving I would very much like to. I actually saw one of those mini sanders at a home depot for like 40-50$ so that would help me with that, but I just got my balance for my next semester of school and would like to save some money :lol:.
I thought about doing a burst over to hide the mahogany but I think I'd rather leave it as I'm not hating the look of it. I'm quite sure if I'm gonna go through with the dragon burst yet, if I don't then it will most likely be just dyed green or blue and the mahogany will be natural.
 

BlackMastodon

\m/ (゚Д゚) \m/
Contributor
Joined
Sep 26, 2010
Messages
8,729
Reaction score
5,768
Location
Windsor, ON
Update again!
So to answer the previous question, no I will not be doing the RAN type contours on the inner horns, though I wish I could have. Another build, another time I suppose. But I digress!
I did some work this morning:

IMG_0873.jpg


IMG_0875.jpg


Pretty happy with how it turned out. I tried to avoid showing too much mahogany on the insides o the horns but as I was trying to use the grinder (I got impatient and used the same 4.5" wheel) it started taking off the maple in certain spots and showing the mahogany so I just said screw it and made it work. Ninja kitty didn't seem to mind sitting 6 feet away from me while I was doing the grinding either:

IMG_0878.jpg


So after a bit of sanding on the top to smooth things out a bit and get rid of the burns, this is where I left off:

IMG_0879.jpg


Overall, I'm rather happy with it.

Next on the list:
1. Recessed input jack (gonna have to figure out how to do that, any links in project guitar?)
2. Drill in between pickups for wires.
3. Drill for volume pot and switch, also recess them.
4. Add a tiny bit of mahogany to the control cavity to fit the magnets, since I'm dumb and didn't do that when I was routing :noplease:.
5. Make sure neck fits well and scale length is right, also drill for neck screws and carve the heel.
6. Dye and finish.
7. ????
8. Profit?

Also should I show mahogany all the way around or leave it as is? I kind of like it how it is.

TL;DR here's more pics.

IMG_0881.jpg


IMG_0883.jpg


IMG_0885.jpg


IMG_0887.jpg


IMG_0889.jpg


IMG_0891.jpg


IMG_0893.jpg
 

BlackMastodon

\m/ (゚Д゚) \m/
Contributor
Joined
Sep 26, 2010
Messages
8,729
Reaction score
5,768
Location
Windsor, ON
Made a mockup with CorelDRAW for the recessed input jack, the brown/purple is the wood and the black is the jack.

InputJackMockup.jpg


Will this work if I just make the hole big enough to tighten the nut of the input jack onto? Or at most just put a washer in front of it or something?

Also does anyone have an opinion about the mahogany? Should I show it evenly along all the sides or leave it as is?
 
Top
')