First Build 6 String

  • Thread starter Genuine Carrot
  • Start date
  • This site may earn a commission from merchant affiliate links like Ebay, Amazon, and others.

Genuine Carrot

Active Member
Joined
Dec 5, 2010
Messages
25
Reaction score
3
Location
Ireland
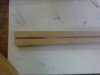
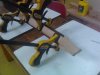
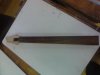
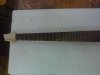
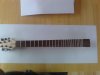
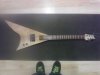
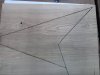
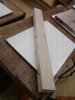
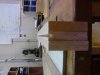
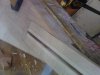
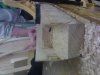
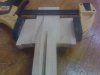
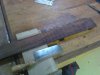
So I've been working on my 6 string build for the last few months now, really starting to come together

My design is a sinle pickup, thru-body, offset V with a curved base, white ash body, three piece maple neck with a rosewood fretboard.

My components are...
Kluson Tuners
Graphtech Nut
Dunlop Frets
EMG 89-R
Gotoh Bridge and Thru-Body Tail

Will upload pics of progress so far ASAP
 

This site may earn a commission from merchant links like Ebay, Amazon, and others.

Genuine Carrot

Active Member
Joined
Dec 5, 2010
Messages
25
Reaction score
3
Location
Ireland
The first few weeks were easy enough, got this all done pretty fast had to glue the 3 pieces of maple and let it set for a few days before i went any further though, then i cut the truss rod slot and afterwards cut the neck shape.
 

Attachments

  • 504.jpg
    504.jpg
    233.5 KB · Views: 18
  • 152.jpg
    152.jpg
    801.3 KB · Views: 18
  • 155.jpg
    155.jpg
    944.8 KB · Views: 13
  • 508.jpg
    508.jpg
    254.8 KB · Views: 22
  • 558.jpg
    558.jpg
    378.8 KB · Views: 25

Genuine Carrot

Active Member
Joined
Dec 5, 2010
Messages
25
Reaction score
3
Location
Ireland
i have to say the hardest part by far was the god awful job of the fretboard, i started out with a raw piece of rosewood, had to plane it, cut it to thickness, plane it again, mark the fret slots, cut them, make a 12 inch radiused sanding block, HAND SAND the board to the 12 inch diameter, then sand up from 40 grit through 60, 80, 120, 220, 600 and 1000 grit sand paper. this took the longest out of all of the parts by far. Afterwards i set to work on curving the back of the neck with a spokeshave, then cut off the top of the head and glued this maple onto the sides to widen the area available to make the headstock. then cut out the schecter inspired headstock design. meanwhile i was working on the neck socket which i used a mortise machine to do the rough stuff and then did the detail with a chisel and a mallet to get the neck fitting snugly in the pocket, please excuse the guy flipping you off in the photo, i plan to edit out that particular display when i submit my report to the teacher :L and as you can also see, i split part of my finger open while chiseling, ah the joys of hand tools, please excuse the burn marks from the table saw :/ i didn't want to use it personally
 

Attachments

  • 2011-05-20 12.18.23.jpg
    2011-05-20 12.18.23.jpg
    236.7 KB · Views: 13
  • 2011-05-20 11.45.15.jpg
    2011-05-20 11.45.15.jpg
    349.5 KB · Views: 41
  • 2011-05-06 11.32.09.jpg
    2011-05-06 11.32.09.jpg
    216.3 KB · Views: 16
  • 2011-09-05 14.53.57.jpg
    2011-09-05 14.53.57.jpg
    205.9 KB · Views: 12
  • 536.jpg
    536.jpg
    276.9 KB · Views: 14

BlackMastodon

\m/ (゚Д゚) \m/
Contributor
Joined
Sep 26, 2010
Messages
8,730
Reaction score
5,772
Location
Windsor, ON
That hand is brutal, makes my blisters look like nothing! At least now your blood and sweat has gone into the guitar!
 

Genuine Carrot

Active Member
Joined
Dec 5, 2010
Messages
25
Reaction score
3
Location
Ireland
it actually looked 10 times worse than it was, just the chisel went pretty deep, it slipped and just shot straight into my finger :/ and it was one of the few times i hadn't followed the "both hands behind the blade" rule, just the angle was so damn awkward :L thanks mate, about to upload some more pics now
 

Genuine Carrot

Active Member
Joined
Dec 5, 2010
Messages
25
Reaction score
3
Location
Ireland
in the last few weeks i've brought a lot of it together, the trussrod was installed (i just used some masking tape to secure it and i had to deepen the truss slot in the center to allow the rod to bend properly), the fretboard glued on (using some insulation tape to protect the trussrod from glue) and then the excess at the sides trimmed off, i then re-sanded the entire board from 220 up through 600, 1000 and finally 2000 grit sand paper, of which i've to buy more tomorrow, i did the frets only 2 days ago and trimmed the edges today with a knock off of a dremel tool, broke 2 attachments trying to find a suitable one, frets are a LOT tougher than some might expect, btw, i used the 12 inch radiused sanding block along with a padded clamp and some super glue to set them in, keeping a cloth with acetone nearby to wipe any excess off. and yes, in the meantime i did cut the headstock, drill the holes and install the machineheads, had to (resentfully) send the neck to the table saw once again to thin the headstock as it was too thick to take the machineheads, yes, i am a firm believer that using anything other than hand tools when a hand tool is all that's necessary is a crime (i know some people who use a jigsaw to cut straight lines :wallbash: )
 

Attachments

  • 2011-10-04 11.44.18.jpg
    2011-10-04 11.44.18.jpg
    149.9 KB · Views: 12
  • 2011-10-18 13.43.18.jpg
    2011-10-18 13.43.18.jpg
    218.3 KB · Views: 14
  • 2011-10-21 09.38.14.jpg
    2011-10-21 09.38.14.jpg
    163.8 KB · Views: 12
  • 2011-11-11 09.27.24.jpg
    2011-11-11 09.27.24.jpg
    169.1 KB · Views: 17
  • 2011-12-20 12.09.37.jpg
    2011-12-20 12.09.37.jpg
    164.1 KB · Views: 26

Iamasingularity

7string Ghost
Joined
Nov 20, 2011
Messages
955
Reaction score
41
Location
The Deep web.
Could I see some pics on the neck from both sides the sides? Just want to check it out. Also what calculation did you use for the fretting? I can`t help to think that the frets are spaced a little off, but that might just be my view of the photo. Keep us updated! Cheers.
 

JStraitiff

Melodic Mamma Jamma
Joined
Feb 7, 2011
Messages
1,179
Reaction score
47
Location
Buffalo, NY
Lol. I was scanning through the pictures and saw a lot of blood. "Oop, looks like he messed up"
 

Genuine Carrot

Active Member
Joined
Dec 5, 2010
Messages
25
Reaction score
3
Location
Ireland
Could I see some pics on the neck from both sides the sides? Just want to check it out. Also what calculation did you use for the fretting? I can`t help to think that the frets are spaced a little off, but that might just be my view of the photo. Keep us updated! Cheers.

i used stew mac's fret calc to find the measurements for the frets, i'm pretty sure it's down to the photo's angles

i'll upload a pic of the entire guitars progress so far in another hour or two
 

Genuine Carrot

Active Member
Joined
Dec 5, 2010
Messages
25
Reaction score
3
Location
Ireland
sorry for the MAJOR delay in updates, however a LOT of progress has been made :D
 

Attachments

  • Guitar.jpg
    Guitar.jpg
    221.6 KB · Views: 20
Top
')