KR250 Consolidated Build Thread

  • Thread starter KR250
  • Start date
  • This site may earn a commission from merchant affiliate links like Ebay, Amazon, and others.

MikeNeal

Well-Known Member
Joined
Aug 20, 2013
Messages
764
Reaction score
730
Location
Toronto, ON
I just use my fret cutters to cut the tang off.

Does a decent job in seconds. Would like to try the actual nippers stew Mac sells
 

LiveOVErdrive

CNC hack
Joined
Aug 17, 2016
Messages
3,974
Reaction score
3,807
Location
Minneapolis, MN
I just use my fret cutters to cut the tang off.

Does a decent job in seconds. Would like to try the actual nippers stew Mac sells
I tried that and bent the hell out of my frets. I want to try my bench grinder on this build. Worst case I'll use a dremel with a diamond cutter, but I hate using dremels.
 

Soya

Poor person
Joined
Aug 28, 2014
Messages
1,213
Reaction score
1,551
Location
Illinois
I just use a dremel with a cut off disc to grind off the tang. Fastest way I've found with using stainless frets.
 

This site may earn a commission from merchant links like Ebay, Amazon, and others.

KR250

Build addict
Joined
Aug 29, 2015
Messages
739
Reaction score
1,160
Location
Seattle
Had thought about the stew mac tool for nipping, but figured I'd try the grinding method since files are cheap and easy to replace. It's also very repeatable, fast, and gives a perfect flat edge with no burs. I use only stainless frets now, and never had decent results with just the flush cutters, other than to rough cut the tangs off when I filed the rest by hand. I'm on the 7th guitar with stainless frets using the same Stew Mac cutters which have held up well. Dremel sounds like a good idea too, but quite happy with the LMI tool.

Fretting is the point in the build I finally get to hear all the background music :p
 

KR250

Build addict
Joined
Aug 29, 2015
Messages
739
Reaction score
1,160
Location
Seattle
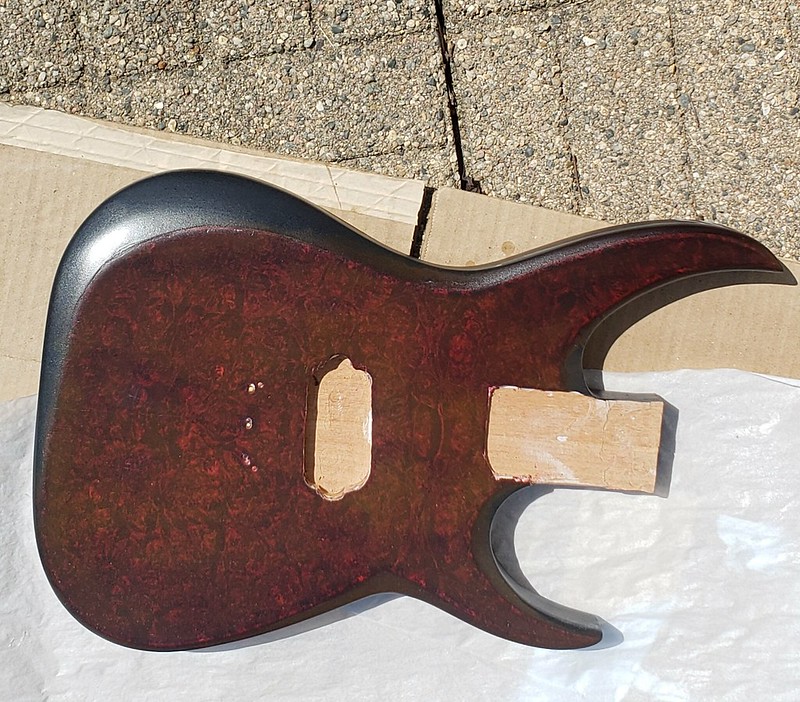
Fretwork is about half way done, pressed and glued in, then beveled the sides. Still need to level, crown and do the edges. Neck angle is just about spot on so ready to glue in at some point. Starting to think about finish options, original thought was a blood burst with a fade out to black on the edges. Kinda really digging the natural wood look though so might nix the red and either keep it all natural or a black burst only on the edges. WWSSO do?

upload_2018-12-21_17-35-26.png


upload_2018-12-21_17-37-53.png

Roughing in the transition on the neck heel. I think it will be the most ergo guitar I have done yet once finished. Still a lot of meat to take out, monitoring to make sure I don't do too much.
upload_2018-12-21_17-38-20.png
 

KnightBrolaire

SSO's unofficial pickup tester
Joined
Mar 19, 2015
Messages
21,280
Reaction score
28,645
Location
Minnesota
I'd do the red and black burst personally. burl looks awesome with red on it. That's what I ended up doing for my superstrat build:
43776398172_6650272a8e_c.jpg
 

KR250

Build addict
Joined
Aug 29, 2015
Messages
739
Reaction score
1,160
Location
Seattle
Right on, yeah that looks good and still preserves the look. Back to the original plan it is! I have just a few small scraps left to test on.
 

KR250

Build addict
Joined
Aug 29, 2015
Messages
739
Reaction score
1,160
Location
Seattle
Had some time today. Bridge is routed and did a test fit. All good. Some lines could be cleaned up, but my router is on the fritz. I use the Foredom piece for the angled cut. Neck is glued on, will finish the heel tomorrow maybe. I also did the entire bevel but forgot to take a picture of the body, the line extends inward 1 inch now.
upload_2018-12-24_17-45-38.png

upload_2018-12-24_17-41-45.png

Poly glue. Have been using this for the last few builds. Really like working with it. Spread it out with a brush, then lightly mist it to activate. Can't be undone like Titebond 1, but good for oily woods.
upload_2018-12-24_17-45-4.png
 

KR250

Build addict
Joined
Aug 29, 2015
Messages
739
Reaction score
1,160
Location
Seattle
Missed one.... this is the Evertune with the new comb mocked up.
upload_2018-12-24_21-13-33.png
 

Defyantly

Aspiring Builder
Joined
Feb 15, 2018
Messages
706
Reaction score
458
Location
Idaho
That is one sexy heel!! Also like how clean that back plate looks! Gonna tie the from to the back!
 

KR250

Build addict
Joined
Aug 29, 2015
Messages
739
Reaction score
1,160
Location
Seattle
Got all the little things out of the way finally, did a mock up and now on to finishing. I did a gray wash over the bare wood and sanded back. Not totally sure if I'm happy with how it looked, but seemed OK once some sealer went on. Didn't do anything on the back side, and sanded back most of what I did on the sides. Figure I'll do a few coats of sealer, then grain fill, then another sealer coat, then on to the colors. Thankfully none of the woods require major pore filling, just the two small knots near the bottom of the top piece.

First pass was brushed on to see if I liked it, then a full pass with the HVLP gun.
upload_2019-1-1_16-24-45.png
 

KR250

Build addict
Joined
Aug 29, 2015
Messages
739
Reaction score
1,160
Location
Seattle
Well, almost done with sanding sealer/grain filling etc. I'll be honest it's my least favorite part, and the most time consuming. I've the top right where I want it and the back side is really close with just a few spots I likely need to touch up. I'll probably leave the back side a natural finish, but could do a translucent gray/black too. Going to work on the top dyes next then on to gloss top coats. Picked up some Brite Tone satin so I can do the last few passes on the neck with that.

upload_2019-1-11_8-14-1.png

Super smooth finish at 400 grit after multiple passes leveling everything almost perfect.
upload_2019-1-11_8-14-48.png

Makeshift spray booth - keeping the shop dust out of this area. Also swapping out the lights for LED versions so I can really see what's going on. Highly recommend the Hyperikon fluorescent replacement bulbs (removes the ballast).

upload_2019-1-11_8-16-30.png

Started another project at the same time as this one, another friend build. Cool thing about this is that he's doing almost all the work with me just giving close guidance. It'll basically build itself! Neck through 7 string with Camphor Burl top, Ash wings, and a Maple/Purplheart neck.

upload_2019-1-11_8-18-35.png

I bought flatsawn piece of hard maple, so cut and flipped it to be quarter sawn.
upload_2019-1-11_8-19-14.png
 

Defyantly

Aspiring Builder
Joined
Feb 15, 2018
Messages
706
Reaction score
458
Location
Idaho
Your work is so clean and inspiring! Keep it up! I love seeing the updates!
 

KR250

Build addict
Joined
Aug 29, 2015
Messages
739
Reaction score
1,160
Location
Seattle
Did the staining today over top of the sanding sealer. Still a bit of a learning process. I sanded everything with 800 which really helped the stains adhere. Also found they would not adhere anywhere grain filler was still present.

Started with red, ended up not really diluting it much at all to get the strongest color out of it. This seemed to also create the most even coverage.
upload_2019-1-12_16-38-14.png

The black burst was a bit tricky. Started with a diluted bit along the edges, then went most straight black into a rag along the very outside edge. Took about an hour or so of touching up spots and re-blending to get it satisfactory. A little bit of bleed through the tape line, cleaned up most of it but some bled again from the first clear coat. I probably could have diluted the black a bit more on the edges to show more of the burl, but I like the contrast.

upload_2019-1-12_16-40-18.png

Shot a few coats of clear and saw some flaws, so did some staining touch ups on top of the clear at the base of the upper horn (not pictured here). Home stretch now, and just counting up the number of top coats. Aiming for about 20 total. I used up almost an entire quart on the last guitar, expecting about the same here.
upload_2019-1-12_16-40-57.png
 
Top