My adventure with my first 7 string build.

This site may earn a commission from merchant links like Ebay, Amazon, and others.
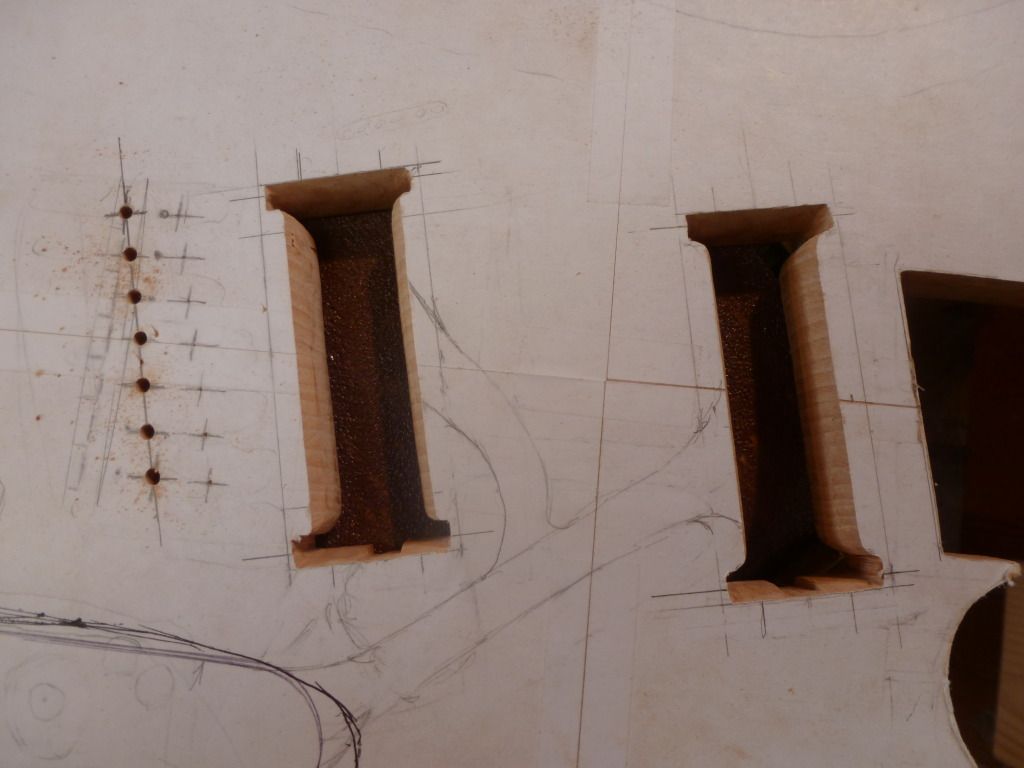
EQGuitars

Member
Joined
Mar 29, 2011
Messages
17
Reaction score
1
Location
Allston, MA
I just checked the progress and wow! It looks amazing, especially for your first build! As for your mounting, I would seat the pickups at the bottom of the cavity and trace the mounting holes with a piece of artist's pencil graphite or a tracing scribe through the top of the pickup.

Once you have established the screw locations and drill to the depth you need, use foam window sealant (you can get it at Home Depot and it already has adhesive on one side) to support the pickup from the underside without the need for springs. Given that the pickups you have chosen are mostly hollow you may need to use more than one layer, but it will definitely do the job and give you ideal control over the pickup height.
 

aaron_rose

more bigger
Joined
Jun 25, 2011
Messages
314
Reaction score
24
Location
Bellingham, wa, guitar enthusiest
Ok thanks guys!

I think after talking to a few people listening to what you all just said here and looking at some pickups im onboard now. definatly dry fit, then score it where the screws go "I am going to pre drill with a uber tiny drill bit a tad" put the foam down and adjust to height. I was hoping I could just "cut" out the pup cavitys since my top and body wood aren't glued together yet with the tried and true drill bit jig saw combo.. but now that these are in my hands i see that I will more than likely be doomed to a forsner bit and a chizzle.. or a .. router. Unsure which path to take yet, guess I will cross that road when i get to it. which will be soon.
 

EQGuitars

Member
Joined
Mar 29, 2011
Messages
17
Reaction score
1
Location
Allston, MA
Definitely go the way of the router :) You can make as many mistakes as you need to cutting a proper-fitting template out of MDF or decent-quality plywood, then once it looks and fits right, double-stick foam tape it in position and route the cavities to the required depth with a flush-trim ball-bearing guide router bit. The bit should only cost about $15-$20 and will save you HOURS in the long run, especially because the template is reusable.

Also, if your neck blank is already final width, use a straightedge along both sides of it to mark lines on the body that you can use to center the template for each route.
 

aaron_rose

more bigger
Joined
Jun 25, 2011
Messages
314
Reaction score
24
Location
Bellingham, wa, guitar enthusiest
Got an issue with the bridge/fret wood/fret height in relationship to the neck pocket depth. Since my fret wood is around 5/16th thick and we don't want to carve any of the sepele out we have opted to add a 1/8 - sandwich of purple heart in between the maple and sepele to compensate for the discrepancy in question. Working on it tomorrow, will post pics and information as it develops.

Glad I went with lace.... due to how light they are. lol

Thanks to the people at Lace also I ordered the pups Friday and received them Monday!
 

JStraitiff

Melodic Mamma Jamma
Joined
Feb 7, 2011
Messages
1,179
Reaction score
47
Location
Buffalo, NY
^you mean the fretboard is too low and youre making it higher by adding a shim piece?

I was concerned about this myself on my build. i think ill take the body down on mine instead.
 

scherzo1928

has wood for you
Joined
May 21, 2010
Messages
3,605
Reaction score
628
Location
Mexico City
Definitely go the way of the router :) You can make as many mistakes as you need to cutting a proper-fitting template out of MDF or decent-quality plywood, then once it looks and fits right, double-stick foam tape it in position and route the cavities to the required depth with a flush-trim ball-bearing guide router bit. The bit should only cost about $15-$20 and will save you HOURS in the long run, especially because the template is reusable.

So much this.

Just a couple of things. Do NOT use foam double tape. Since it's foam, your template WILL move around as you press agaist it. There are tons and tons of kinds of double sided tape, just look for one without foam, should have no problem finding it.

As for the router bit, a good 2" bit with ballbearings should cost around $40, but holy hell, are they worth it. Or you can buy a smaller bit, and route the shape by layers... pretty much like a CNC would.

Btw, check these guys out. I'm in love with their router bits. They may have horrible customer service, but they sure know how to make the best router bits... and they are cheap!

MLCS Router Bits and Woodworking Products

edit: check out the katana bits =D
 

aaron_rose

more bigger
Joined
Jun 25, 2011
Messages
314
Reaction score
24
Location
Bellingham, wa, guitar enthusiest
So much this.

Just a couple of things. Do NOT use foam double tape. Since it's foam, your template WILL move around as you press agaist it. There are tons and tons of kinds of double sided tape, just look for one without foam, should have no problem finding it.

As for the router bit, a good 2" bit with ballbearings should cost around $40, but holy hell, are they worth it. Or you can buy a smaller bit, and route the shape by layers... pretty much like a CNC would.

Btw, check these guys out. I'm in love with their router bits. They may have horrible customer service, but they sure know how to make the best router bits... and they are cheap!

MLCS Router Bits and Woodworking Products

edit: check out the katana bits =D

Thanks brother, much obliged!

update,

Frets are on but unfinished. here are a few shots of them, this is my cellphone so it makes it look like thers huge long gouges / pores in it, but there are none, one of the pics shows it as it really is.

IMG093.jpg


IMG094.jpg


this is the one that best shows the wood as it really is...

IMG095.jpg


more tomorrow!
 

HaMMerHeD

Well-Known Member
Joined
Jan 31, 2011
Messages
1,774
Reaction score
515
So much this.

Just a couple of things. Do NOT use foam double tape. Since it's foam, your template WILL move around as you press agaist it. There are tons and tons of kinds of double sided tape, just look for one without foam, should have no problem finding it.

As for the router bit, a good 2" bit with ballbearings should cost around $40, but holy hell, are they worth it. Or you can buy a smaller bit, and route the shape by layers... pretty much like a CNC would.

Btw, check these guys out. I'm in love with their router bits. They may have horrible customer service, but they sure know how to make the best router bits... and they are cheap!

MLCS Router Bits and Woodworking Products

edit: check out the katana bits =D


Just wanted to pimp Amana's router bits.

I got this thing:

Dado Clean out Router Bits - Toolstoday.com - Industrial Quality Carbide Tipped Router Bits

It's a 1/2" top bearing pattern bit with a 1/4" depth of cut.

And it is fucking amazing for cutting cavity cover pockets and my recessed bridge route. (Before, Routed, Bridge Fitted)

It's also available in 1/8", 1/2", 3/4", and 1" depth cuts.
 

EQGuitars

Member
Joined
Mar 29, 2011
Messages
17
Reaction score
1
Location
Allston, MA
So much this.

Just a couple of things. Do NOT use foam double tape. Since it's foam, your template WILL move around as you press agaist it. There are tons and tons of kinds of double sided tape, just look for one without foam, should have no problem finding it.

As for the router bit, a good 2" bit with ballbearings should cost around $40, but holy hell, are they worth it. Or you can buy a smaller bit, and route the shape by layers... pretty much like a CNC would.

Btw, check these guys out. I'm in love with their router bits. They may have horrible customer service, but they sure know how to make the best router bits... and they are cheap!

MLCS Router Bits and Woodworking Products

edit: check out the katana bits =D

Hi Aaron, I just wanted to explain my reasons for the recommendations so you can decide what works best for your application. Although I agree with scherzo that foam tape does have more side to side flexibility and the potential for slight motion, since this is your first build, the thickness of the foam tape allows for more complete cohesion between the perfectly flat template and your guitar body in the case that your body has any dips or other slight imperfections that haven't been sanded out yet. If there is not total surface to surface contact, thinner, less conforming tape can get loaded with dust as you're routing and fail, even if the adhesive is strong.

I would also definitely recommend using a bit that is 1" long or less for routing pickup cavities. Although a 2" bit is perfect if you are using a router table to shape the body, you would need to have a template that is a minimum of 1.25" thick to have the bearing positioned high enough to route the cavity to the 1" depth you need. Also, definitely route in passes! You should never try to rout the full depth in once pass because the torque that you are creating trying to go through that much material greatly increases both the chance of chipping out the edge, and causing the template to slip because of the greater pressure that you are applying to the wall.

I know I'm outlining worst case scenarios here but with routing, when something goes wrong it usually happens quickly and irreversibly. Just take some time to evaluate which methods/tools are most appropriate for the job at hand and Good luck!

Your fretboard looks fantastic btw!
 

aaron_rose

more bigger
Joined
Jun 25, 2011
Messages
314
Reaction score
24
Location
Bellingham, wa, guitar enthusiest
Right on Dave, I plan on buying a router, a nice one. Then I will spend a few weeks chewing through whatever hardwoods i can get my hands on to practice on before I put the tool to the real thing. The router tool is in its own right something that ya gotta get good with and comfortable with. Unfortunately I am not there yet so it looks like were gonna forsner chizzel these bad boys in. I thank you for your guidance and information!
 

TonyFlyingSquirrel

Cherokee Warrior
Joined
May 4, 2006
Messages
4,697
Reaction score
1,716
Location
Auburn, Washington
Aaron, since you're up in Bellingham, you may consider on a trip to Seattle, visiting Tap Plastics. They're a couple of blocks away from Guitar Center, and on the way to the EMP.

You can take your scaled drawing, and have them make you some lazer cut acrylic templates similar to the Stew Mac ones, but to your own specs. They'll send them down to their master shop in California, but when you get them back, they'll be top notch templates.

I always make at least 2 templates at once. One of them is always the control, the other the usable one. The control never gets used, just becomes a reference for reproductions.

I'd recommend the thicker 5/8' piece of acrylic as it provides more surface for the ride bearing.
 

TonyFlyingSquirrel

Cherokee Warrior
Joined
May 4, 2006
Messages
4,697
Reaction score
1,716
Location
Auburn, Washington
When I worked at Warmoth, even though all the bodies/necks are CNC carved, they are all template traced with an acrylic template & then cut on a bandsaw with 1/4 " reveal in order to avoid "flyouts" & excessive material waste. The bodies all have 2 index holes (to line up with the CNC table) there's one in the cavity that becomes the bridge pickup, the other becomes one of the neck mounting screw holes.

Another good resource for info on building templates is my good friend of the past decade, Neal Moser. I used to use the thinner ones, but he turned me onto using the thicker ones. Check out his page, Guitar Building Classes
 

aaron_rose

more bigger
Joined
Jun 25, 2011
Messages
314
Reaction score
24
Location
Bellingham, wa, guitar enthusiest
Few new shots of today's progress. Pickups fit like a glove. Got the control cavity routed and a cover is in my hands right now that I have to work till it fits. The wire channels are also in.

Ordered the back string ferrules as well as the bolt on neck hardware ferrules, ordered the sperzel tuners the nut and potentiometers.

DSC_0004.jpg


P1000444.jpg


P1000445.jpg


P1000446.jpg


P1000447.jpg


P1000448.jpg


P1000449.jpg


P1000450.jpg
 
Top
')