My first build

  • Thread starter Themadcow
  • Start date
  • This site may earn a commission from merchant affiliate links like Ebay, Amazon, and others.

BR10N

Well-Known Member
Joined
Aug 14, 2010
Messages
220
Reaction score
75
Location
California
IMG_1742.JPG


That fretwire is enormous by the way. The biggest that allparts sells, with the smallest tang size, go figure.

Props for attempting to dress those frets!:lol:
 

This site may earn a commission from merchant links like Ebay, Amazon, and others.

adrock

long ball larry!
Joined
Nov 6, 2008
Messages
984
Reaction score
263
Location
austin, tx
This fretwire is bigger than 6000, by quite a lot actually.

Jumbo Fret Wire | Allparts.com


I should have read the fine print, I had a hard time just pulling it through my fret bender.
wow. a crown height of .102", and a width of .170". that's pretty much twice the size in every direction versus "standard" guitar frets. jumbo is quite the understatement...
 

Purelojik

Well-Known Member
Joined
Oct 8, 2009
Messages
1,803
Reaction score
877
Location
Las Vegas
wow. a crown height of .102", and a width of .170". that's pretty much twice the size in every direction versus "standard" guitar frets. jumbo is quite the understatement...


i guess he doesnt need to scallop his fretboard now.. :lol:
 

Purelojik

Well-Known Member
Joined
Oct 8, 2009
Messages
1,803
Reaction score
877
Location
Las Vegas
IMG_1775.JPG


Whats this Output jack style called? i know it seems like a dumb question but i cant think of the term. i kinda want one instead of using a football or square outer plate.
 

Themadcow

Well-Known Member
Joined
Oct 23, 2010
Messages
124
Reaction score
16
Location
Edmonton Alberta
wow. a crown height of .102", and a width of .170". that's pretty much twice the size in every direction versus "standard" guitar frets. jumbo is quite the understatement...

I love a scalloped fretboard, but I'm not sure I'll even bother if I decide to use those on the 8.
 

Themadcow

Well-Known Member
Joined
Oct 23, 2010
Messages
124
Reaction score
16
Location
Edmonton Alberta
So back to the garage this afternoon for a couple hours, I'd really like to see my old man's guitar ready for finishing by the weekend

First I installed the tuners. Nothing magic here, just make sure the headstock is the right thickness, and drill the holes where you want them

IMG_1785.JPG


IMG_1787.JPG


IMG_1788.JPG


Then I pulled out the smoked black ebony stain, because the ebony isn't black enough for my taste

IMG_1789.JPG

IMG_1790.JPG


That's more like it. I love the look of ebony, I like it even more when it's black as the night sky

I stopped by the engraving store today to see what kind of material I needed to build an engravable truss rod cover. He gave me a piece of scrap for free, told me to cut it out and they would engrave it for me.

Black on the top, aluminum on the bottom, should look awesome. Not sure what I'll engrave on there yet. Something sentimental for the fact that my dad has had to put up with my shit for the last 33 years:hbang:

IMG_1791.JPG
IMG_1792.JPG


That's it for this weekend, expect more updates soon........
 

Themadcow

Well-Known Member
Joined
Oct 23, 2010
Messages
124
Reaction score
16
Location
Edmonton Alberta
IMG_1775.JPG


Whats this Output jack style called? i know it seems like a dumb question but i cant think of the term. i kinda want one instead of using a football or square outer plate.

They are called a barrel jack, or something else depending on the manufacturer. They are awesome, they look cool and take up very little real estate.

The only down side I have heard of them is that they wear out faster than regular jacks, because of the variance in size of different guitar cables.
 

BlackMastodon

\m/ (゚Д゚) \m/
Contributor
Joined
Sep 26, 2010
Messages
8,810
Reaction score
5,939
Location
Windsor, ON
Now that fretboard looks bitching! I was thinking to myself that you had like some kinda of glue residue left on it or something but I guess it was just a really pale piece of ebony.
 

Themadcow

Well-Known Member
Joined
Oct 23, 2010
Messages
124
Reaction score
16
Location
Edmonton Alberta
Now that fretboard looks bitching! I was thinking to myself that you had like some kinda of glue residue left on it or something but I guess it was just a really pale piece of ebony.


Ya, it definitely wasn't as nice as the one that I used on the 8 string. I think I may stain that one too, the blacker the better I say.
 

ryantheyetti

Well-Known Member
Joined
Apr 4, 2011
Messages
147
Reaction score
8
Location
Shippensburg/Limerick Pa Usa
i just wanna say i just read through everything in this thread and i was thinking about buying a new guitar this summer but instead you have inspired me to just build my own!

and i dont care what anybody says that 8 string looks bitchin man, i will be very closely following this thread

keep up the great work!
 

Themadcow

Well-Known Member
Joined
Oct 23, 2010
Messages
124
Reaction score
16
Location
Edmonton Alberta
Small update, finished sanding the body with 120, mounted up the hardware to see what it looks like installed. I like it. Tomorrow I'll finish sanding the body to 220 and that's finished. Ready for shellac.

The stain on the neck doesn't hold up to sanding so it obviously isn't penetrating the ebony that deep. I'm gonna have to wait till it's scalloped and completely sanded then I will stain it again.

IMG_1814.JPG


There's a plastic film on the truss rod cover, so it looks like ass in the picture, but trust me, it looks good. Have to drop it off for engraving this week sometime

IMG_1811.JPG


IMG_1815.JPG


Oh and just a heads up on my next project, once I get the 8 string done, I have decided that an 8 string xiphos would be awesome. I want to learn how to build a neckthru anyway.

IMG_1800.JPG


That one will kick ass, but not until I get these 2 done. Dimarzio's 8 string pups are available april 22nd, so I wont be able to route the pickups till I get them.

Stay tuned for more updates.
 

Swyse

Swyse
Joined
Jan 24, 2011
Messages
1,763
Reaction score
238
Location
N IL
love your builds man, is that xiphos8 going to be headless or is the design pending?
 

Elysian

Banned
Joined
Dec 15, 2004
Messages
6,779
Reaction score
551
Location
Plano, TX
IMG_1651.JPG


IMG_1652.JPG


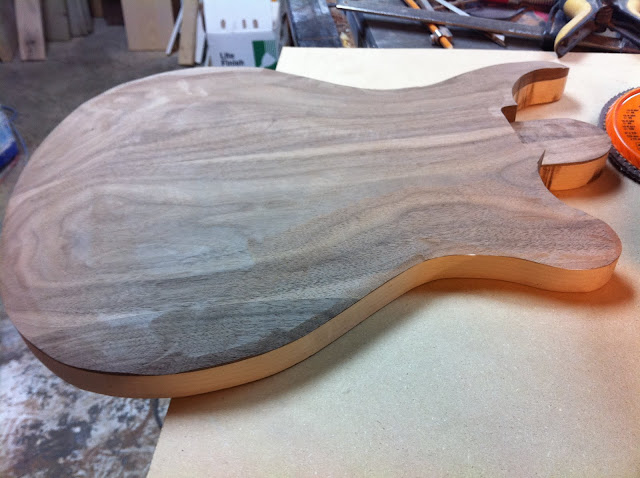
Notice the 5" grinder with the flap wheel. It's my favorite tool now:hbang:
Decided to do the top with it instead of the belt sander this time. What you see in the pics is as far as I'm gonna go with it. It's a dangerous way of doing it cause if you slip you can destroy your work piece. The advantage is that it took me less than 5 minutes to get the guitar to that point:yesway:
That's how I do my carves, though I don't use a handheld grinder, I attach my flap wheel to a chock and attach it to my drill press, that way I'm in control of the body, the flap wheel is stationary.
 

Fiction

For Mod
Joined
Mar 20, 2011
Messages
3,651
Reaction score
258
Location
Newcastle, Australia
That 8 looks awesome, But i'm really digging the body shape of your dads build. I need a new guitar so i'm looking into buying a S-Prestige, but I think after this I will consider attempting to build a prs styled. Being 17 I don't have many tools... except for a grandad with his own workship :metal:

So I'll make this like a project with him, and get one badass guitar out of it, can't wait for more updates just loving reading this, progress is great.
 

Themadcow

Well-Known Member
Joined
Oct 23, 2010
Messages
124
Reaction score
16
Location
Edmonton Alberta
Well, it had to happen eventually, I fucked up, and not in a good way.

Somehow I managed to snap the fretboard off right behind the 21st (last) fret on my dad's guitar...........

Now some people would find this extremely frustrating, but I saw it as an opportunity for an upgrade. I headed down to W.G. Chanin hardwoods to take a look and I found me a beautiful chunk of Indian rosewood.

First the pencil lines are drawn. I use fretfind 2d to print out a template, then use the lines as a guide. I haven't managed to find a ruler with 64th increments, and besides, my eyes suck anyway.

IMG_1833.JPG


Now all you need to do is triple check the measurement to where the 2 pieces of paper line up. Then transfer the lines onto the fret board

IMG_1821.JPG


You might be able to tell from that pic that my little arrows don't line up on the opposite sides of the fretboard. This is why we never trust that the paper template is 100% lined up. I make sure to square the edges of the fretboard and use a square to mark out the lines. That way everything is perpendicular to the center...no more fuck ups:agreed:

IMG_1829.JPG

My $13 home depot miter box, cause my wife won't let me buy the Stewmac one yet.

I did get this though
IMG_1834.JPG


Best money spent so far. I struggled to radius the other board, the block I built wasn't perfect and it was hard to get it level across the board.

IMG_1836.JPG


IMG_1830.JPG


Well that's what I managed in a couple hours today. I also removed the fretboard from my dad's neck. Just used a palm router to get rid of most of it , then I got out the trusty flapper wheel and ground off the rest.

Tomorrow I'll glue the new board on and hopefully fret it monday night. then I'll pop the nut on and see what it sounds like before final sanding and finish. Getting close. The new D-activater 8 string pups are supposedly out in a week, so I'll be getting back to work on the 8 string soon, in case you guys are interested in how that one is coming along.

Cheers:wavey:
 

Themadcow

Well-Known Member
Joined
Oct 23, 2010
Messages
124
Reaction score
16
Location
Edmonton Alberta
Well I suppose I'll detail this so any one trying to learn.

First....Don't remove an existing fretboard
Second....Don't remove an existing fretboard
Third.....You get the Idea

I won't bore you with the detail. Let's just say I needed to pull the router out to deepen the truss rod channel after I finish leveling the neck. Don't use an angle grinder to take the fretboard off if you want a perfectly level surface to reglue a new board to.


So first I clamp the fretboard on with light clamps.
IMG_1837.JPG


Then I drilled through the frets at 4 spots with some small drill bits. You can see them on the table in the above pick

Then I turn the bits upside down and use them to anchor the fretboard in the spot I want

IMG_1838.JPG


Then I add as many clamps as many clamps as I can fit, and some titebond glue.

IMG_1839.JPG

IMG_1841.JPG


I should mention that I dry clamped everything first to make sure there were no gaps at all. Gaps = Glue lines, and we don't want that.

If I get the chance, I will pull it out of the clamps tonight so I can bring the neck home. That just leaves fretting and installing the nut.. so close.


Latest posts

Top
')