Second build, Modern/BM/super strat

  • Thread starter dankarghh
  • Start date
  • This site may earn a commission from merchant affiliate links like Ebay, Amazon, and others.

DistinguishedPapyrus

Well-Known Member
Joined
Oct 1, 2012
Messages
1,212
Reaction score
444
Cheers guys. Another stupid question (forgive me, first time dealing with a string through)

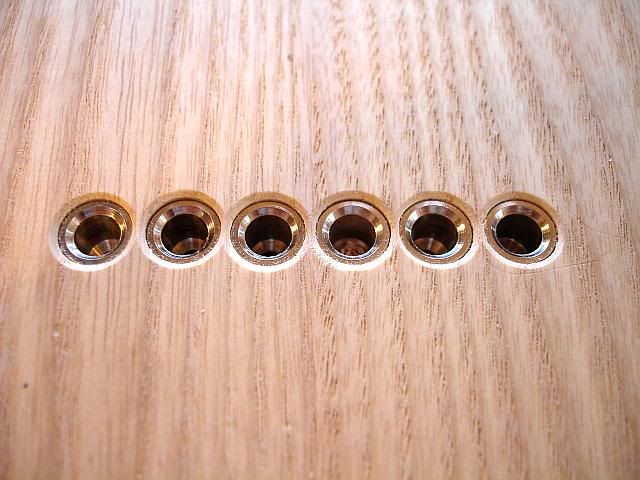
I'm trying to drill out the ferules on the rear of the guitar, because there is already a small string hole, the mahogany just tears. I can do a practise hole on the same timber cleanly, but when drilling into a pre drilled hole, it tears.

Anyone have a solution? I'm considering dowling up 5mm or so before drilling..

Heres a good idea (IMO) you could try... Drill a hole through a piece of MDF or scrap the same diameter as the string through holes. position the hole in the scrap exactly over the string through holes (use a dowel or the butt end of the drill bit itself to help you position it accurately) Clamp the scrap down in place, drill through the scrap into the body using the drill bit thats the right size for the ferrules. Make sure to drill to the correct depth. Then unclamp everything, check your work, repeat...

The pressure of the scrap on top should keep the body wood from tearing or flaking.


Sure man. I just use a stewmac binding bit for the router. So simple, so easy.

Cool to see you use the stewmac binding bits... I haven't tried using them yet myself but I wanna buy some for my next build. So you like them? They are good quality and such? Also, did you have to do anything special to prevent tear out when going against the grain?
 

This site may earn a commission from merchant links like Ebay, Amazon, and others.

dankarghh

Well-Known Member
Joined
Apr 23, 2014
Messages
408
Reaction score
82
Location
AUS
Thanks again guys, DistinguishedPapyrus, ended up using your suggestion. It isn't perfect but it's pretty close.

To answer your question, I do like them, can't fault it. I just have the bit and the one bearing bit to do a 1.5mm trench. No need to buy 1000 bearings. Never had an issue with tear out or anything of the sort.
 

moikey

Active Member
Joined
Jan 28, 2015
Messages
42
Reaction score
0
Location
UK
Looks good man! Could you share details of that thicknessing jig? I'll need to stick something like this together for my build. Cheers.
 

dankarghh

Well-Known Member
Joined
Apr 23, 2014
Messages
408
Reaction score
82
Location
AUS
Looks good man! Could you share details of that thicknessing jig? I'll need to stick something like this together for my build. Cheers.

Its about as rough as can be my friend. Basically I made a little sled for the router using some scrap pine, then used 2 other pieces of pine that were taller than the body to attach the sled. Ghetto.
 

dankarghh

Well-Known Member
Joined
Apr 23, 2014
Messages
408
Reaction score
82
Location
AUS
I've been slack lately, but heres where i'm at:

1kdi0.jpg


2z6ci1f.jpg


17e791.jpg


2ylpit4.jpg
 

Hywel

Well-Known Member
Joined
Sep 10, 2012
Messages
680
Reaction score
84
Location
UK
If the tear-out bothers you and you don't fancy doing the ferrule block, ferrules with a lip like the ones below would probably cover most of it and anything poking out could be filled with sawdust and superglue. They tend to be 10mmø if you want to see how effective they'd be

guitar_ferrules_blk.jpg


You could even slightly countersink/recess the ferrules to remove some of the tear-out.

DSC04181.jpg


Still looks pretty sexy either way! :D
 

dankarghh

Well-Known Member
Joined
Apr 23, 2014
Messages
408
Reaction score
82
Location
AUS
Use a darker dye. Sand back a little so it's mostly the figured stripes retaining dye, then re-stain with a lighter one.

Thanks man. My dye is premixed unfortunately, it does go on very black however. I've been wondering if its a dye issue. After I sand it back i'm left with this washy gray. Worth getting another stain?
 

Pikka Bird

Vaya Con Cornholio
Joined
Sep 3, 2009
Messages
3,209
Reaction score
135
Location
Odense; Denmark
^Yes. I don't know what it's like on your hemisphere, but here you can get a rather generous amount of mix-it-yerself powder (enough for litres of dye) for something like five of your foreign moneys. Then you decide the strength.
 

Renkenstein

Well-Known Member
Joined
Apr 16, 2014
Messages
804
Reaction score
16
Location
Kansas City
^Yes. I don't know what it's like on your hemisphere, but here you can get a rather generous amount of mix-it-yerself powder (enough for litres of dye) for something like five of your foreign moneys. Then you decide the strength.

I went the powder route on this. I was able to mix some BLAAACK black for my dye job. I used a lot more of that than I did the medium black I mixed up. With dye, it's essentially painting with watercolors. The dye can be reactivated at any time pre-seal coat. I'd definitely go darker(like fkn BLAAACK black), let that dry for 24 hours, start sanding a bit to remove the highs, and then take just a wet cloth and start moving the stuff around. I'd do it in a couple steps. You can't go wrong, as anything you do CAN be removed easily by sanding. I have a ton of fun dying tops.

...funny, I always hated painting with watercolors in my art classes, and this becomes my new medium, and I love it. Probably has a lot to do with the paper not curling up on itself...maple stays pretty rigid.
 

dankarghh

Well-Known Member
Joined
Apr 23, 2014
Messages
408
Reaction score
82
Location
AUS
I went the powder route on this. I was able to mix some BLAAACK black for my dye job. I used a lot more of that than I did the medium black I mixed up. With dye, it's essentially painting with watercolors. The dye can be reactivated at any time pre-seal coat. I'd definitely go darker(like fkn BLAAACK black), let that dry for 24 hours, start sanding a bit to remove the highs, and then take just a wet cloth and start moving the stuff around. I'd do it in a couple steps. You can't go wrong, as anything you do CAN be removed easily by sanding. I have a ton of fun dying tops.

...funny, I always hated painting with watercolors in my art classes, and this becomes my new medium, and I love it. Probably has a lot to do with the paper not curling up on itself...maple stays pretty rigid.

So i had to order some black aniline dye and got it a few days ago. It's alcohol soluble and i was able to make an incredibly dark stain. I pre-wet the top to raise the grain. Here is where i'm at. I can't see how this is fun for you Renk. It always just looks so uneven and amateur. This is black sanded back. Maybe, 3rd attempt?

24qo16u.jpg


w/hardware and different lighting:
n4jfq1.jpg


I'm thinking of making a reaaal lightly tinted black/blue and doing a coat over the top.

My main issue is how it looks when wet, which will undoubtedly be how it looks with a finish. I want a matte look I think. Is there a way for it not to 'pop' so much when finished? Planning on using danish oil.
 

dankarghh

Well-Known Member
Joined
Apr 23, 2014
Messages
408
Reaction score
82
Location
AUS
I don't know if i worded that right. I mean right now when i wet the top, I don't like how it looks so much, but when the top isn't wet it looks decent. I suppose theres not really a way around it?
 

Hywel

Well-Known Member
Joined
Sep 10, 2012
Messages
680
Reaction score
84
Location
UK
You could try a paste wax (Briwax in the UK, not sure about the Aus equivalent) that crates a matte, hard-ish finish without wetting the grain much. Might be worth a try on some scrap to see if it works for you.

Got to admit, bet that looks tasty when wet though!
 

dankarghh

Well-Known Member
Joined
Apr 23, 2014
Messages
408
Reaction score
82
Location
AUS
Hey guys, little update.

I've scrapped this thing, the body anyway. Didn't really like how it was turning out and I made some stupid mistakes with the router (after drilling the jack input i ran the router over the edge to round it over some more and took a chunk out etc).

I've ordered some more wood and spent some time in illustrator (before my trial runs out..) playing with plans/modifying photos of this guitar to get it more where i want it. Looks like this:

245jc5w.jpg


I'll be keeping the neck and making a new body. Swamp ash with a matt black top. (I have some poplar burl on order as well for no.3)
 

Renkenstein

Well-Known Member
Joined
Apr 16, 2014
Messages
804
Reaction score
16
Location
Kansas City
I really don't think you should scrap that build. Revisit it later if you're frustrated.

It's still a great test bed for your next dye efforts. From the top view it's really clean. Routs look good, binding looks good. Sure you've got some dye bleed out on the arm bevel, but that's nothing that can't be removed.

I'm curious as to why you're using alcohol based dye there. With water based, that stuff can really be moved around, but will stay put in the deeper grain. Look at my Siren build. I was able to go from black without much hint of the figure and fade that into natural maple. I'm sure the difference between the alcohol and water holds the key to the mystery.

What kind of black dye finish were you going for?
 
Top
')