Epiphone G400 Modifications

Wretched

Well-Known Member
Joined
Aug 20, 2009
Messages
826
Reaction score
197
Location
Newcastle
So, I bought a used Epiphone G400 (SG) for a few hundred bucks a few months for the sole purpose of practising modification and luthiery skills. Below is the list of modifications I intend to perform, along with a concept image showing how I intend it to look once done:

The mods pictured include:
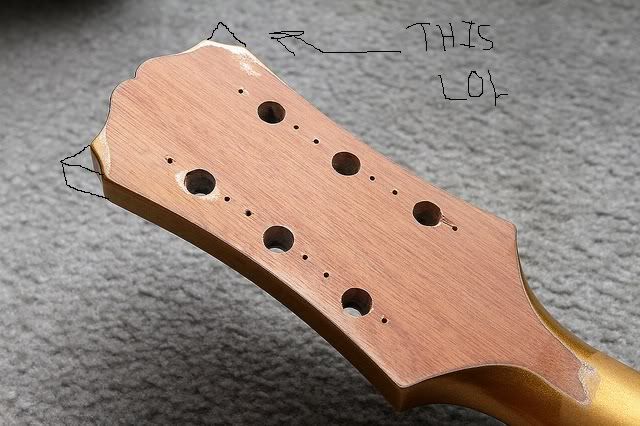
- Reshaping the headstock (I hate the Epi shape) to something like the Gibson shape (no logo)
- Remove pick guard
- Remove the two lower pots and fill the holes, running two volumes with no tone pots
- Remove and fill in the input jack, moving it to a side-mounted one
- Upgrade the tuners to Sperzels
- Upgrade the pickups
- Changing all the hardware and screws to black
- Thinning out the sides of the neck and bit, leaving the back in case I go through to the truss rod (anyone have any idea how much meat exists between the channel and the outside of the neck?)
- Painting most of it satin black, leaving some of the original gold for a set of racing stripes (if the paint doesn't get damaged during the woodwork phase)


6687346341_6478e4a5dc_z.jpg


It was in good condition, but this is how it looked after I spent a night cleaning it up, polishing the frets etc...

6687346945_f6fc088493.jpg


Since then I've been buying the new parts and researching the processes and tools I'm going to need to get all the little parts of the project completed to my satisfaction. I'm a perfectionist, so even though it'll be my first time doing any significant woodwork since high school over 15 years ago, I'll be a little pissed if I screw anything up too badly.

Last night I finally got stuck in and stripped the thing down to its undies...

6687319167_4f5f5f5be0_z.jpg


Nothing remarkable to announce with the dissassmbly process. (You can see the three holes I've marked for filling) I've torn down a few over the years and done some wiring work.

Although I did confirm something odd that I thought I'd noticed: it seems like the body was originally routed for the three humbucker 'special' version of the model.

You can just faintly see the outline of the middle rout under the paint (can't get it to show in photos). Once the pickups were removed, I found that probably through rough manufacture, the thin walls of wood between the routs had broken through to reveal a block of something or other filling the hole. Dodgy!

6687328921_df892e2c78_z.jpg


No biggie... onward and upward and all that.

I bought all the new parts through GFS after a pretty strong recommendation from one of the moderators over on Project Guitar who'd recently used a bunch of stuff on a new V he was building. The list of parts includes locking tuners and a roller bridge as well as one of their Crunchy Pat neck pickups and a Power Rails for the bridge - all in black.

6687323739_3b27f292af_z.jpg


6687332121_1b22d9e28f_z.jpg


6687333139_e6e63d66e3_z.jpg


So, with a reamer for opening up the tuner holes sitting here ready to go; a template for a Les Paul head stock ready to be outlined onto the head stock and some timber plugs coming for the tone pot holes and some Forstner bits on the way for drilling the new jack hole... I'm almost ready to start.

Any suggestions?
 

Wretched

Well-Known Member
Joined
Aug 20, 2009
Messages
826
Reaction score
197
Location
Newcastle
If I were to do anything like that, I think I'd fill the neck pickup hole and go single! heheh
 

This site may earn a commission from merchant links like Ebay, Amazon, and others.

Wretched

Well-Known Member
Joined
Aug 20, 2009
Messages
826
Reaction score
197
Location
Newcastle
Some early progress with an easy win. I grabbed the reamer and opened up the tuner holes a touch (they were already pretty close to the right diameter) to fit the new locking tuners from GFS.

Here you can see the original hole (note all the old mounting screws from the old tuners that will need to be filled before final finishing. I didn't consider the impact filling these holes would have on the gold paint when first conjuring up my ideas and don't intend to repaint any of the gold if I can help it. Any ideas?):
6688228265_ed6c7a6cc5_z.jpg


Twist the reamer in there a dozen times with gentle, moderate pressure - cleaning out the dust every few turns - like this:
6688225803_81115faeeb_z.jpg


And you get nice, clean holes that are larger and will accommodate the new tuners:
6688227003_ae263cc87d_z.jpg


...which look like this when fitted loosely. Much nicer! :)
6688230935_05b6f5f589_z.jpg


6688229773_9519ceb26d_z.jpg
 

Wretched

Well-Known Member
Joined
Aug 20, 2009
Messages
826
Reaction score
197
Location
Newcastle
OK, so things immediately slowed down, as I expected. I've been collecting tools, drill bits and other stuff I think I'm going to need to get all the different things done.

One aspect I've been focusing on is drilling the new output jack into the side. Having read a number of different opinions on what type of bit to use for the cleanest hole, I thought I'd try them all and make up my own mind. The following is the results, which may help some of you out there in the future...

I'll go through the three different types of drill bits I tried, and also show you the quality of hole they drilled:

First up is the Forstner bits. I bought a full set of Carba-Tec bits in metric. Sadly they only had 19mm and 22mm bits, which turned out to be a little too small on one hand and a little too big on the other. But the holes were smooth on the inside.

6794809069_da50852ab2_z.jpg


They're made for cutting nice flat bottomed holes, if that's what you need. You often see people using them to remove the bulk of material out of pickup routs before routing the edges clean with the plunge router.

6794803671_ab817e7b34_z.jpg


As you can see, the hole is smooth on the inside and there's no tear-out at the start of the cut.

6794802689_64c951b3bf_z.jpg


However, both Forstner bits caused some chipping at the end of the cut, as pictured above. This is avoidable if you drill through the workpiece into a piece of scrap. However, in the scnario of drilling an output jack, that's not easily practicable and a little chipping on the inside of the control cavity isn't going to bring me to tears.

6794800351_61498b7913_z.jpg


This is what Irwin Tools markets as a 'Speedbor' bit, which is a close derivative of a spade bit. It actually made a cleaner cut than I was expecting and only caused minimal damage on exit. Again, this is avoidable by drilling through and into a scrap piece.

6794805683_3a8b5b82bc_z.jpg


This is the hole made by the Speedbor or spade bit. As you can see, it's a little rougher. It was much faster than the Forstner bits, though.

Last up is the brad-point or auger bit. I'm not sure if there's a difference between the two as they look the same to me. It drilled aggressively into the timber, but cut clean. It did cause some chipping on the exit. It wanted to dig into the timber so fast the cordless drill I was using almost wasn't powerful enough to cope!

6794807679_e4ebdb7370_z.jpg


6794806527_bedf4ea87c_z.jpg


This is the hole the brad/auger bit made. Clean enough and at 21mm, just the right size for my jack (see below).

6794801533_869f464ae4_z.jpg


For all you luthiers out there, what size output jack hole do you normally drill for a conventional mono jack and what type of bit do you use for the job?

Next step will be to clamp the G400 to the workbench and drill the new jack hole.
 

Wretched

Well-Known Member
Joined
Aug 20, 2009
Messages
826
Reaction score
197
Location
Newcastle
Well, I found myself with some spare time this afternoon, so I grabbed the new Makita 5in random orbital sander and hit the G400 hard. I took the top right through to the bare timber, through the poly coating.

As I suspected, staring me in the face was a resin-filled middle humbucker route. Dodgy buggers. In fact, there was more dodginess going on under that gold paint, with the other pickup routes showing signs of resin filling and re-routing, chip-out filling etc...

6851096799_b3d7113d07_z.jpg


6851095219_5739be7baf_z.jpg


Your eyes do not deceive you. Those are cracks in the resin that fill the third cavity. Hopefully they stay stable when I apply the new finish later on down the track.

Here's a close, close up:
6851093311_b2266e7d22_z.jpg


I also reamed out the three holes that are to be filled and smoothed over. I found a seller on eBay selling 10mm oak tapered plugs and bought their minimum (100 plugs!). Here are the holes opened up to accept the plugs:

6851101139_459c73ee62_z.jpg


Here are the three holes (two tone pot holes and the hole for the original output jack) with the oak plugs jammed gently in them. The plan is to glue them in place, gently chisel the tops flat and sand smooth.

6851098829_2c8b95f78a_z.jpg


I figured the oak plugs were a smart move as I could orient the grain to match the rest of the body and the taper would leave a zero gap on top. Anyone have any suggestions on the best glue to use? I was thinking just Titebond Original, but I want to ensure the glue will be stable under sanding and the final finish. Any comments or suggestions would be great.
 

Pikka Bird

Vaya Con Cornholio
Joined
Sep 3, 2009
Messages
3,209
Reaction score
135
Location
Odense; Denmark
Good progress so far. I love that you're redoing the headstock because I really can't live with the Epiphone 3+3 headstock either. So what about the racing stripes now that you went through the gold?
 

Darkstar124

Strongman
Joined
Oct 7, 2010
Messages
412
Reaction score
46
Location
Chicago, IL
great work! I admire how thorough you were, testing all the bits and all. This is a helpful thread!
 

Wretched

Well-Known Member
Joined
Aug 20, 2009
Messages
826
Reaction score
197
Location
Newcastle
Good progress so far. I love that you're redoing the headstock because I really can't live with the Epiphone 3+3 headstock either. So what about the racing stripes now that you went through the gold?

I realised I would have to go through the gold on the back of the headstock to fill in the little screw holes from the old tuners, AND the back of the neck for the reshaping I plan. So, I figured it'd get a more consistent colour result if I just redid the lot. I'll try filling the grain on the fully sanded through places like the top, prime it etc and repaint the entire guitar in satin black and paint fresh gold racing stripes.
 

Wretched

Well-Known Member
Joined
Aug 20, 2009
Messages
826
Reaction score
197
Location
Newcastle
I drilled the new output jack hole yesterday. I tried buying a 20mm Forstener bit off feeBay, but the first one turned up bent. From what I could tell it was made that way, so while the seller told me he'd send a replacement, I haven't seen it and don't put much faith in getting anything better in return.

So, I grabbed the 20mm spade bit and measured up for the cut. Finding centre, I started by making an indent with the sharp middle of the drill bit, then began the hole by hand with the bit, scoring through the paint finish to try and minimise any chipping.

While the resultant hole wasn't that nice on the inside, the opening into the body was round and neat enough and it fits the jack, so all good!

Here's the hole:
6860286081_85b7904076_z.jpg


Keen eyes may be able to see the hairline crack right under the hole. This was caused by the guitar being clamped down to the bench. When the hole went almost right through, the timber gave way to the clamping pressure and split that small portion of wood along the grain. Lesson learned. Some glue into the crack when I'm gluing the tapered wood plugs should fix it. When not under pressure you can't see the crack at all.

Here's the new jack plate mounted onto the body. It'll be much nicer than the original face-mounted jack when it's all back together:
6860283229_79fc621f90_z.jpg


I also sanded both faces of the head stock so I could fill the old screw holes left by the original tuners and start marking out the cut line for the reshaping of the headstock:
6860281631_09b310521b_z.jpg


Any suggestions on the type of filler for filling up little screw holes before painting? Don't really see the need to go filling each of them with a plug if it isn't going to be wearing a transparent finish later. need something not prone to sinking or swelling.
 

supercolio

Super-spy
Joined
Feb 12, 2012
Messages
66
Reaction score
0
Location
Finland
You mentioned something about changing the headstock, how are you going to do that? D: Do you just sand the name away? Really nice thread. Keep it coming :)
 

Wretched

Well-Known Member
Joined
Aug 20, 2009
Messages
826
Reaction score
197
Location
Newcastle
I plan to reshape the top of the headstock. Original plan has been to use a Les Paul template to shape the top of it like a usual Les Paul. The lower part of the head stock fans out wider than a Les, but it'll still look better than the horrid Epiphone headstock.

I'll use a coping saw and a lot of patience to do the cutting.
 

AwakenNoMore

Wrong Handed
Joined
Jul 22, 2011
Messages
693
Reaction score
234
Location
Chandler, Arizona
for the headstock you could just glue small portions onto the corners that are lopped off and re-shape to classic Gibson style?
 

Wretched

Well-Known Member
Joined
Aug 20, 2009
Messages
826
Reaction score
197
Location
Newcastle
Actually, the Epiphone headstock has wider sections than the Gibson and without going the trouble of filling the original tuner holes and drilling new ones, it would cause problems to remove too much material from the sides as the tuners follow the radius of the existing sides.
 

AwakenNoMore

Wrong Handed
Joined
Jul 22, 2011
Messages
693
Reaction score
234
Location
Chandler, Arizona
your not following me, i'm not talking about reshaping the WHOLE headstock i'm saying just glue on new tips at the top of the headstock on each side where its different from the gibson model

6860281631_09b310521b_z.jpg


LOL ms paint.

do it no one will ever know, lol
 

Pikka Bird

Vaya Con Cornholio
Joined
Sep 3, 2009
Messages
3,209
Reaction score
135
Location
Odense; Denmark
^That'll make the "crown" way taller and wider than a standard Gibson stock. Cutting into it will look lots sleaker, IMO.
 
Top