New Build - Heretic Paradigm 6

  • Thread starter HaMMerHeD
  • Start date
  • This site may earn a commission from merchant affiliate links like Ebay, Amazon, and others.

HaMMerHeD

Well-Known Member
Joined
Jan 31, 2011
Messages
1,774
Reaction score
515
Hey gang. It's been a while. I hope you are all well.

Lovely.

Right then, off we go.

So I'm making myself another instrument. Here are specs:

General Info:
6 string bass guitar
Bolt-on neck
35" scale
26 frets

Wood:
Swamp ash body (Fraxinum americana)
Quartersawn hard maple neck (5 pieces) and fretboard (Acer saccharum)
Bookmatched swamp-ash headplate.
Truss rod adjustment at the head

Hardware:
2.03" (~52mm) Graphtech Black TUSQ XL Nut
Hipshot A-style brass bridge, 0.640" spacing (~16.25mm), chrome
Hipshot Ultralight Y-key tuners (3/8" posts), chrome
Jumbo nickel-silver fretwire (LMII FW57110)
One double-action truss rod
Two pultruded carbon fiber reinforcement rods
Dunlop dual-design locking strap buttons, polished nickel
D'Addario XL light stainless steel strings (.032-.130)
3/4" (19mm) vol/tone knobs, chrome
5/8" (16mm) EQ knobs, chrome

Electronics:
One passive MM-style humbucker pickup
Aguilar OBP-3 onboard pre-amp
18v wiring
Active/Passive switch
50K EQ pots (low, mid, high)
500K master volume and passive tone control
.100uF Sprague orange drop passive tone capacitor

Finish:
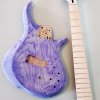
Black pore-fill and purple dye job
High-gloss clear lacquer

It's meant to be something of a double-cut big brother for this bass. The spacing is narrowish because I'm old and my fingers aren't as stretchy as they used to be. Also I want to do more tapping and chords and such, so there we are. This will be my first time working with Swamp ash and quartersawn timber. I've only ever used northern White ash before, which is very hard and very heavy. I'm excited for the look of ash without the pain of carving the hard, heavy northern shit.

Regarding quartersawn wood:
I believe it is wildly overrated for neck building. Wood warps and deforms according to its orientation to the bark, which on a perfectly q-sawn neck, means that it is more likely to bend laterally, perpendicular to the strings, which can't be corrected by a truss rod. In practice, single-piece quartersawn necks are more likely to twist than flatsawn. But I like the straight grain look of properly quartered maple, so here we are. I'll be ripping the maple and making a 5-piece laminated neck with opposing grain and such, just like I would with a flatsawn board. The truss rod will be installed in the center laminate (5/8" thick), and the carbon fiber rods will be epoxy-bedded into the two stringers (3/8" thick). I may or may not glue some walnut and/or mahogany veneers between the maple pieces. I haven't decided yet. I like the look, but it's a lot of very fiddly work.


Here's the design:
q6RUyDF.png


It's a big bass. It'll be about 46.5" long, 13.5" wide. I changed my standard headstock design for this build. I'd been using the old one for ~6 years, and I felt it was time for an update. Here's a side-by-side comparison (new on left, old on right):

QYxUzNy.png


What do you fine folks think?

And here are all the bits that have arrived for it so far:
sNWpbPZ.jpg


It's not much, because I just ordered everything on Thursday. The wood and Hipshot stuff hasn't even shipped yet, so I think it'll likely be another week and a half before I can make some sawdust. I ordered everything but the lacquer and the dye from these vendors: bestbassgear.com, bellforestproducts.com, kieselguitars.com, hipshotproducts.com, and bassstringsonline.com. I am not being compensated by any of them for this thread, but I know a lot of people struggle with where to find stuff. I've used all these vendors for a long time, and I know them to all give great customer service and stand behind their products. I bought the lacquer at Autozone, and the dye from Woodcraft.

Here's hoping I can get started soon.
 

Attachments

  • heretic-paradigm-guitar-build.jpg
    heretic-paradigm-guitar-build.jpg
    244.1 KB · Views: 23
Last edited:

BlackMastodon

\m/ (゚Д゚) \m/
Contributor
Joined
Sep 26, 2010
Messages
8,390
Reaction score
4,988
Location
Windsor, ON
I'm sure the pictures are great but unfortunately they aren't working. The 3rd party sites like imgr and photobucket have changed their policies so embedding on other sites doesn't work anymore.
 

skeels

..to pay the beels
Joined
Oct 7, 2009
Messages
4,139
Reaction score
795
Location
milwaukee,WI
skeels likes this

Good to see you again, buddy. I am back after being MIA for a while too.
 

This site may earn a commission from merchant links like Ebay, Amazon, and others.

HaMMerHeD

Well-Known Member
Joined
Jan 31, 2011
Messages
1,774
Reaction score
515
I guess i'll just use SSO's built-in image stuff.

000_design.png
headstocks.png
001_first_stuff_20180310_124538.jpeg

I'm sure the pictures are great but unfortunately they aren't working. The 3rd party sites like imgr and photobucket have changed their policies so embedding on other sites doesn't work anymore.

If that's the case, imgur should really stop giving sharing links.

I found this (https://help.imgur.com/hc/en-us/articles/201569776-I-can-t-see-the-images):
Are you unable to see your images on a forum?
We allow hotlinking on forums, but hotlinked images cannot be used as content for a website, including blog posts, avatars, site elements, and advertising. You can read our terms of service for more info. If you believe your site has been mistakenly blocked, please contact us for assistance.

So it seems they do still allow hotlinking for forums. I can actually see the images just fine in the OP. So I'm not sure what's up. I've emailed them for more info.
 
Last edited:

HaMMerHeD

Well-Known Member
Joined
Jan 31, 2011
Messages
1,774
Reaction score
515
The pre-amp arrived today.

002_obp3.jpg

If John East makes the Cadillac of on-board bass pres, the Aguilar OBP-3 is the Corvette. Key features are 18 decibels of boost and cut on the Mid and Low bands, 16 dB on the high band, and an easily adjustable mid frequency cut-off. The resistors are there to reduce popping with the mid switch. I'm not sure if I'm going to put a mid-switch on. I hadn't planned to, but it's so easy...

It is a lot of wires though.

Also, looks like the wood will be here on Wednesday. So that's fun.
 
Last edited:

KnightBrolaire

SSO's unofficial pickup tester
Joined
Mar 19, 2015
Messages
21,343
Reaction score
28,800
Location
Minnesota
I guess i'll just use SSO's built-in image stuff.

View attachment 59667
View attachment 59668
View attachment 59669


If that's the case, imgur should really stop giving sharing links.

I found this (https://help.imgur.com/hc/en-us/articles/201569776-I-can-t-see-the-images):
Are you unable to see your images on a forum?
We allow hotlinking on forums, but hotlinked images cannot be used as content for a website, including blog posts, avatars, site elements, and advertising. You can read our terms of service for more info. If you believe your site has been mistakenly blocked, please contact us for assistance.

So it seems they do still allow hotlinking for forums. I can actually see the images just fine in the OP. So I'm not sure what's up. I've emailed them for more info.
imgur blocked sso because people use imgur versions of their photos to sell guitars/gear, which is apparently against their TOS
basically, stay away from photobucket or imgur, they don't work here.
 

HaMMerHeD

Well-Known Member
Joined
Jan 31, 2011
Messages
1,774
Reaction score
515
imgur blocked sso because people use imgur versions of their photos to sell guitars/gear, which is apparently against their TOS
basically, stay away from photobucket or imgur, they don't work here.

Yeah, I worked that out.

Fortunately, in my day job, I'm a web developer, so I'm building my own image hosting platform.
 

KR250

Build addict
Joined
Aug 29, 2015
Messages
739
Reaction score
1,160
Location
Seattle
The pre-amp arrived today.

I wired one of these up for a buddies bass, it sounds great! Good choice. I'm trying out the Audere pre-amp now since the wiring is quite a bit simpler.
 

HaMMerHeD

Well-Known Member
Joined
Jan 31, 2011
Messages
1,774
Reaction score
515
I got some more hardware today, and the wood!

But first, the hardware:
003_pickup_hardware.jpg
Knobs, output jack, nut, volume and tone pots, and the pickup. It's a Car...Kiesel 6-string MusicMan style humbucker, designed for bridges with .64 spacing, which is what I'm using. I chose it because I liked the price, and I like MM style 'buckers. The smaller knobs will be for the EQ, and the larger are for master volume and passive tone.

Here's the wood:
004_the_wood.jpg
Swamp ash, quartersawn maple neck, and quartersawn maple fretboard.

The ash has a lot more character in the grain than the hard northern White ash I normally use.
005_swampash.jpg
It's 59" long, 9-5/8" wide, and 1-3/4" thick. The body blank needs a board 41" long and 7" wide, and the final body thickness will be 1-1/2", so this will give me a lot of wiggle room. I'll also have enough left over to make a matching headplate.

The neck maple is perfectly straight, so I'm excited about that.
006_neckmaple.jpg
There's a little bit of runout toward one end, but it's not bad. I'll make that the headstock end. It'll be ripped, laminated, and scarfed anyway. The board is 53" long, and 4-3/4" wide, by 1-1/16" thick. At a minimum, I needed 45" long, 3.5" wide, and 7/8" thick, so again I'll have some wiggle room.

And last but not least, the fretboard! It has a lot more visible curl than I thought it would. I'll be able to get two six-string bass fretboards out of this board, or one six-string bass board and 2 regular-size guitar boards.
007_fretboard.jpg
This board is 28-5/16" long, 5-1/2" wide, and 1-1/16" thick. I'll re-saw it into two ~7/16" thick boards and choose the most figured one for the fretboard for this bass. It only needs to be about 3-5/16" wide, so I'll be able to rip the darker heartwood off the one edge and have nice, clean white maple for the fretboard.

In terms of raw lumber, this may be my most expensive build yet, though it's only really about $200 worth of wood. The 4-string this 6-er is being built as a companion for is made of about $30 worth of hard maple and ash.

Anyway! I'm excited about the wood. It exceeds my expectations. Bell Forest Products really came through for me. The ash in particular is just fantastic.
 

HaMMerHeD

Well-Known Member
Joined
Jan 31, 2011
Messages
1,774
Reaction score
515
I got some more stuff in today. Self-adhesive pickup foam, center-detent 50K linear taper EQ pots, the active/passive toggle switch, the passive tone capacitor, and...some chrome screws I think. I'm still waiting on the bridge and tuning machines from Hipshot. I think they might have shipped today.

Anyway, I tweaked the design a bit, changed the neck spec, and fleshed out the pickup cavity route.

000_design2.png

I tweaked the upper horn, to make it look a bit more substantial and a bit more tapered.

I decided to go with a 3-piece neck...mostly because I'm tired of all the fiddly work with gluing 5-piece necks together.

And I bumped the fretboard up to 26 frets...because why not? I have the fretwire, and the board is long enough, and it'll make the neck pocket a bit bigger, so I can put more neck screws in.

So, win-win-win, as far as I'm concerned.
 

HaMMerHeD

Well-Known Member
Joined
Jan 31, 2011
Messages
1,774
Reaction score
515
I decided to go with threaded inserts and 1/4"-20 socket cap machine screws for attaching the neck.

So I got those, as well as a full-size print. This is a big bass. Today I'm going to try to get the body slab done.

008_neck_hardware.jpg
Stainless steel 1/4"-20 x 1" and 1/4"-20 x 1-1/4" machine screws and brass inserts.
 

HaMMerHeD

Well-Known Member
Joined
Jan 31, 2011
Messages
1,774
Reaction score
515
I got my fretboard prepped and marked.

010_fretboard_1.jpg

I'll slot it tomorrow. My slotting tools and technique are rather different than most I've seen, so I'll go into some depth about it.
 

HaMMerHeD

Well-Known Member
Joined
Jan 31, 2011
Messages
1,774
Reaction score
515
So I was going for a neck beam width of 3.5", and it ended up being this:
011_neckBlank_1.jpg
So, just a little more than half a millimeter off. The final overall neck width is only 3.263", so I've got plenty of room.
 

HaMMerHeD

Well-Known Member
Joined
Jan 31, 2011
Messages
1,774
Reaction score
515
OK, so I got a lot done today. The neck beam is glued together, and the fretboard is slotted.

My process was borne of necessity: I needed to slot a board, and I couldn't afford to spend hundreds on one of those fancy StewMac/LMII fret slotting jigs, and I sure couldn't afford to buy a CNC router to do it for me. So I invented my own process.

My slotting tools are as follows:

  • Stewmac fret saw
  • Verified square speed-square
  • 3M Super 77 spray glue
  • Blue painter's tape
  • Printed full-size template
  • Some clamps
First step is to cover the fretboard in masking tape. This is to make cleanup after slotting easier.
012_slotting_1.jpg

Second step is to mark the back with the direction of the nut, and of the jointed edge. This is so that you reference square off of the square side, and don't slot it backward.
013_slotting_2.jpg

Third is to prepare the printed template.
014_slotting_3.jpg

I cut it down the middle for two reasons: One, in case i put the first one down wrong and have to give it a second shot. Two: since the exposed spray glue on the blue tape helps the speed -square/cutting-guide stay put.
015_slotting_4.jpg
Naturally, I fucked this step up and put it on crooked.

So I pulled it off and used the other side.
016_slotting_5.jpg

To be continued....
 

HaMMerHeD

Well-Known Member
Joined
Jan 31, 2011
Messages
1,774
Reaction score
515
Then it's just a matter of sticking the speed square up against the jointed edge of the board, lined up with the printed line representing the slot to be cut.
017_slotting_6.jpg
the edge of the speed square that is pressed against the board is beveled slightly so that the saw's teeth don't rub against it and get dulled. This makes it look, at this angle, like it's slightly off. It's not.

Then you just press the saw against the speed square and saw away.
018_slotting_7.jpg
Voila! A slot is born!

Then you just work your way down the board, one slot at a time:
019_slotting_8.jpg

Eventually, you've cut all your slots, and you take the tape off, and the template and spray glue come off with it.
020_slotting_9.jpg
(The cut slots don't line up with my drawn lines, because my drawn lines were incorrect. I measured every slot very carefully afterward, and they are all placed correctly.)

Of course, you have to adjust the placement of the clamps from time to time. Not a big deal though.

From start to finish, it took me 50 minutes. It would be faster if I had a better jig, but this is so cheap and easy, I'm just not motivated to spend hundreds on the LMII jig (the StewMac one isn't big enough to do a 6 string bass board anyway).

Anyway, I hope this helps some of you broke bitches to have more confidence in your modest tools, and a cheap and effective means of cutting your fret slots. The most expensive part of this setup was definitely the StewMac fret saw with depth stop. With that saw, and the speed square, and the can of glue, this whole setup cost me about $66


I do feel I should mention that, if you are starting a build, and you're going to order your fretboard from LMII, it's definitely worth paying the $9 to have them slot it on their CNC slotting machine. It will be more accurate than you can do with a handsaw, and $9 is a hell of a deal. They will slot any number of slots at any scale, as long as it fits on the board. Professional luthiers buy pre-slotted boards from LMII all the time. If I was charging someone for my shop time, it would cost a hell of a lot more than $9 for me to spend that ~1 hour doing it.
 

HaMMerHeD

Well-Known Member
Joined
Jan 31, 2011
Messages
1,774
Reaction score
515
So I got a care package from Hipshot today:
023_bridge.jpg
0.64" spacing aluminum type A bridge


024_tuners.jpg
3/8" post chrome ultralight tuners

And I also got my router templates back from the CNC shop:
021_router_templates.jpg

And the pickup fits!
022_router_templates_2.jpg

I now have almost everything I need to finish this thing. I'm only still waiting on some chrome pickup screws, a pair of white felt strap button washers, and of course, enough spare time to do the work.
 

MoonJelly

a subtle stinging sensation..
Joined
Mar 11, 2016
Messages
1,305
Reaction score
870
Location
North Atlanta, GA
Anyway, I hope this helps some of you broke bitches to have more confidence in your modest tools, and a cheap and effective means of cutting your fret slots. The most expensive part of this setup was definitely the StewMac fret saw with depth stop. With that saw, and the speed square, and the can of glue, this whole setup cost me about $66


I do feel I should mention that, if you are starting a build, and you're going to order your fretboard from LMII, it's definitely worth paying the $9 to have them slot it on their CNC slotting machine. It will be more accurate than you can do with a handsaw, and $9 is a hell of a deal. They will slot any number of slots at any scale, as long as it fits on the board. Professional luthiers buy pre-slotted boards from LMII all the time. If I was charging someone for my shop time, it would cost a hell of a lot more than $9 for me to spend that ~1 hour doing it.

Message received. I think your setup is far more efficient than what I've done in the past...LMII here I come lol

And suddenly the reason shops charge so much for fanned frets is clear to me. You may need to do it by hand and it takes ~1 hour or more.
 

HaMMerHeD

Well-Known Member
Joined
Jan 31, 2011
Messages
1,774
Reaction score
515
Message received. I think your setup is far more efficient than what I've done in the past...LMII here I come lol

And suddenly the reason shops charge so much for fanned frets is clear to me. You may need to do it by hand and it takes ~1 hour or more.

Fanned frets increase complexity on a several levels. Cutting the slots is the least of it, I think.
 
Top